Implementing External Authentication in Pangolin Using Tinyauth and the Middleware Manager
Pangolin now supports flexible authentication options through the Middleware-manager. While Authentik and Authelia are popular options, this guide shows how to implement external authentication using Tinyauth — a lightweight, rising middleware project. ![]()
Prerequisite: This article assumes you’ve already implemented Pangolin’s Middleware Manager. If not, go through that guide first.
 Prerequisites
- Pangolin deployed with the Middleware Manager
- Docker and Docker Compose set up on your VPS
- A registered domain (e.g.
mydomain.com) with a subdomain for Tinyauth (e.g.tinyauth.mydomain.com) pointing to your VPS - Basic familiarity with managing Docker and editing YAML files
 Step 1: Add Tinyauth to Docker Compose
In your existing Docker Compose setup, add the following service:
  tinyauth:
    image: ghcr.io/steveiliop56/tinyauth:v3
    container_name: tinyauth
    restart: unless-stopped
    environment:
      - PORT=10000
      - SECRET=${TINYAUTH_SECRET_KEY}
      - APP_URL=https://tinyauth.mydomain.com
      - LOG_LEVEL=0
      - USERS_FILE=users_file
    volumes:
      - ./config/tinyauth/users:/tinyauth/users_file
 Step 2: Create the Secret Key
Create a .env file in the same folder as your docker-compose.yml file with this line:
TINYAUTH_SECRET_KEY=your-generated-secret-key
You can generate the key using:
openssl rand -base64 32 | tr -dc 'a-zA-Z0-9' | head -c 32
 Step 3: Create User Credentials
Create a new folder in the pangolin config folder called tinyauth
Inside ./config/tinyauth/, create a users file with the login credentials.
Use the htpasswd tool to generate secure bcrypt hashes. Note: escape $ characters as $$.
echo $(htpasswd -nB test) | sed -e s/\\$/\\$\\$/g
Example content for a test/test login:
test:$$2y$$05$$BsP6eSe4FIAqhhtGO8EUEuZWkdgWtU9NdqrJopxicTVvqxMQZ6BYu
Alternatively, credentials can be passed directly via the
USERSenvironment variable
You can get more info on the Tinyauth set up including integration of OAuth to Github in this Jim’s garage video).
NOTE: THE FOLLOWING CHANGES COULD RESULT IN BREAKING CHANGES. PLEASE BE CAREFUL.
 Step 4: Expose the Tinyauth Port
Update your gerbil service in Docker Compose to expose the Tinyauth port:
    ports:
      - 10000:10000  # Exposes Tinyauth
 Step 5: Add Traefik Routing Rules
Edit your Traefik dynamic configuration file (e.g., dynamic_config.yml) to include Tinyauth routes.
 HTTP Redirect Router
  tinyauth-router-redirect:
    rule: "Host(`tinyauth.mydomain.com`)"
    service: tinyauth-service
    entryPoints:
      - web
    middlewares:
      - redirect-to-https
 HTTPS Router
  tinyauth:
    rule: "Host(`tinyauth.mydomain.com`)"
    service: tinyauth-service
    entryPoints:
      - websecure
    tls:
      certResolver: letsencrypt
 Service Entry
  tinyauth-service:
    loadBalancer:
      servers:
        - url: "http://tinyauth:10000"
 Step 6: Define Middleware Template
In your Middleware Manager templates file (middleware/templates.yml), add a new entry:
  - id: tinyauth
    name: Tiny Auth
    type: forwardAuth
    config:
      address: http://tinyauth:10000/api/auth/traefik
 Step 7: Start Services
Start everything:
docker compose up -d
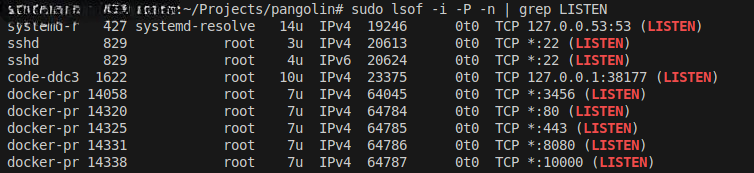
Check services are running:
sudo lsof -i -P -n | grep LISTEN
Screenshot: this is the command and the result with
:10000showing in the list.
In your browser, open an incognito tab and visit:
https://tinyauth.mydomain.com
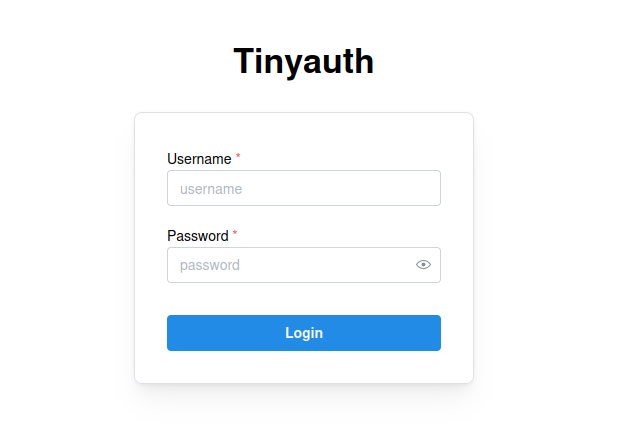
You should see the Tinyauth login page.
Step 8: Test with a Simple App
Set up a basic app (like a Python web server):
python3 -m http.server 8000
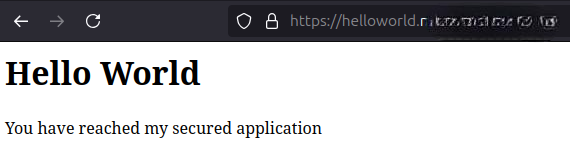
Expose it with Pangolin as a resource, e.g.:
https://helloworld.mydomain.com
Verify it works without authentication first.
Screenshot Here’s my URL unauthenticated.
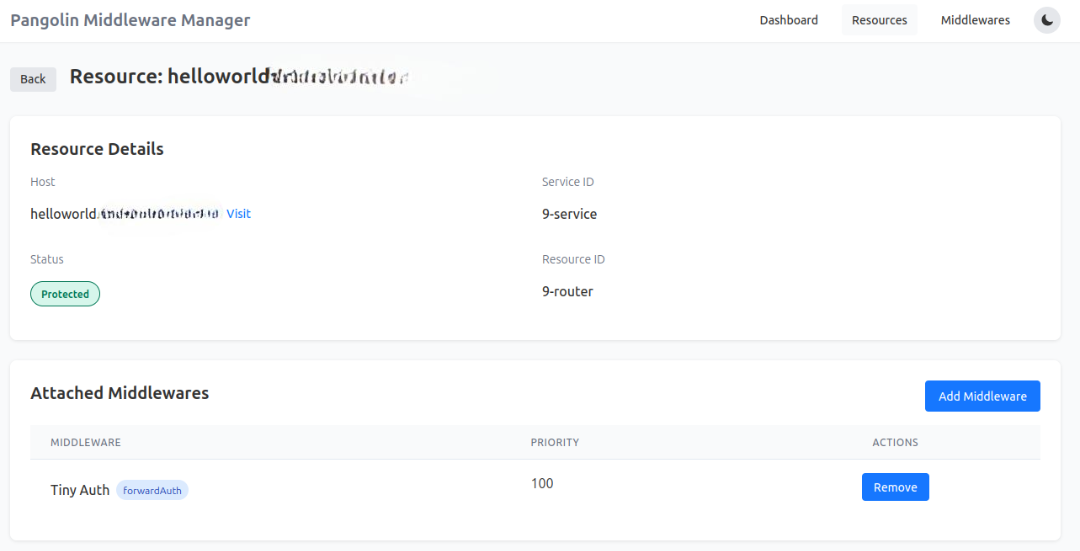
 Step 9: Attach Middleware in Pangolin
- Open the Pangolin Middleware Manager UI.
- Navigate to the Middlewares tab.
- Confirm you see
Tinyauthlisted.
- Confirm you see
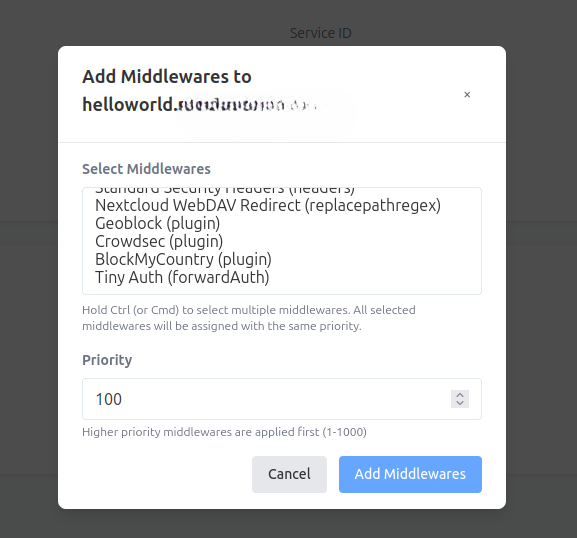
- Return to the Dashboard and click Manage next to the resource you want to protect.
- Under Attached Middlewares, click Add Middleware.
- Select Tinyauth (forwardAuth) and click Add Middlewares.
 Step 10: Final Test
Open your protected resource in an incognito window:
https://resourcename.mydomain.com
You should be redirected to https://tinyauth.mydomain.com for login. After authenticating, you’ll return to the protected app.
 Summary
In this article, we walked through how to set up the blazing fast, minimalist Tinyauth as a forward auth provider for Pangolin. With just a few steps and clever integration using the Middleware Manager, you now have a lightweight and secure authentication layer protecting your self-hosted apps. There are more integrations to come!!!
 Thanks for Reading!
Tinyauth is a fantastic project from an incredibly talented young developer — it’s inspiring to see such innovation in the open-source space. If you found this guide helpful, consider exploring more of what Pangolin has to offer, and feel free to share your feedback or improvements in the Pangolin forum.
Happy self-hosting! ![]()
![]()