Deploying Pangolin Locally with Traefik.me: A Comprehensive Guide
In this tutorial, I’ll walk you through how to deploy Pangolin locally without a domain name using the traefik.me service. This approach is especially useful for development, testing, or personal environments where you don’t want to purchase a dedicated domain.
root@testbench:~# sudo ./installer

=== Basic Configuration ===
Enter your base domain (no subdomain e.g. example.com): homestack.10.24.7.119.traefik.me
Enter the domain for the Pangolin dashboard (default: pangolin.homestack.traefik.me): pangolin.homestack.10.24.7.119.traefik.me
Enter email for Let's Encrypt certificates: discourse@hhf.technology
Do you want to use Gerbil to allow tunned connections (yes/no) (default: yes): no

=== Admin User Configuration ===
Enter admin user email (default: admin@homestack.traefik.me): discourse@hhf.technology
Create admin user password:
Confirm admin user password:

=== Security Settings ===
Disable signup without invite (yes/no) (default: yes): yes
Disable users from creating organizations (yes/no) (default: no): no

=== Email Configuration ===
Enable email functionality (yes/no) (default: no): no
Docker is not installed. Would you like to install it? (yes/no) (default: yes): yes
=== Starting installation ===
Would you like to install and start the containers? (yes/no) (default: yes): yes
=== CrowdSec Install ===
Would you like to install CrowdSec? (yes/no) (default: no): no
Installation complete!
What is traefik.me?
Traefik.me is a “magic domain” service that provides wildcard DNS for any IP address. Similar to services like nip.io or xip.io, it allows you to create domain names that point to specific IP addresses without modifying your hosts file or setting up your own DNS server.
For example:
10.0.0.1.traefik.meresolves to10.0.0.1myapp.10.0.0.1.traefik.mealso resolves to10.0.0.1myapp.traefik.meresolves to127.0.0.1(localhost)
This is perfect for local development environments where you need domain names but don’t want to register actual domains.
Prerequisites
Before we begin, you’ll need:
- A Linux system with root access
- Docker and Docker Compose (we’ll install this during the process if needed)
- Your local IP address (you can find this with
ip addrorifconfig) - Basic familiarity with terminal commands
Step 1: Determine Your Local IP Address
First, find your local IP address. You’ll need this to create your traefik.me domain.
ip addr
Look for your primary network interface (often eth0 or wlan0) and note the IP address (format like 192.168.1.x or 10.x.x.x).
For this tutorial, let’s assume your IP address is 10.24.7.119.
Step 2: Download the Pangolin Installer
# Download the installer
wget -O installer "https://github.com/fosrl/pangolin/releases/download/1.1.0/installer_linux_amd64"

# Make it executable
chmod +x installer
Step 3: Run the Installer
Now run the installer with sudo privileges:
sudo ./installer
Step 4: Configure Pangolin with traefik.me
When prompted during installation, enter the following information:
-
Base Domain: Enter your IP-based traefik.me domain
homestack.10.24.7.119.traefik.me(Replace
10.24.7.119with your actual IP address) -
Dashboard Domain: Enter the subdomain for the Pangolin dashboard
pangolin.homestack.10.24.7.119.traefik.me -
Email for Let’s Encrypt: Enter any valid email address
(Note: Let’s Encrypt validation may have issues with traefik.me domains, but Traefik will still work with self-signed certificates) -
Tunneling: When asked if you want to use Gerbil for tunneling, select
no
(We’re creating a simple reverse proxy setup without tunneling) -
Admin User: Configure your admin email and password
(Remember that the password must include uppercase, lowercase, numbers, and special characters) -
Security Settings:
- Disable signup without invite:
yes(recommended) - Disable users from creating organizations: Your choice based on your needs
- Disable signup without invite:
-
Email Functionality: You can disable this for local testing
-
Docker Installation: If Docker isn’t installed, choose
yesto install it -
CrowdSec Installation:
NO
Step 5: Wait for Installation to Complete
The installer will:
- Create the necessary configuration files
- Download Docker images
- Start the Pangolin containers
This may take several minutes depending on your internet connection.
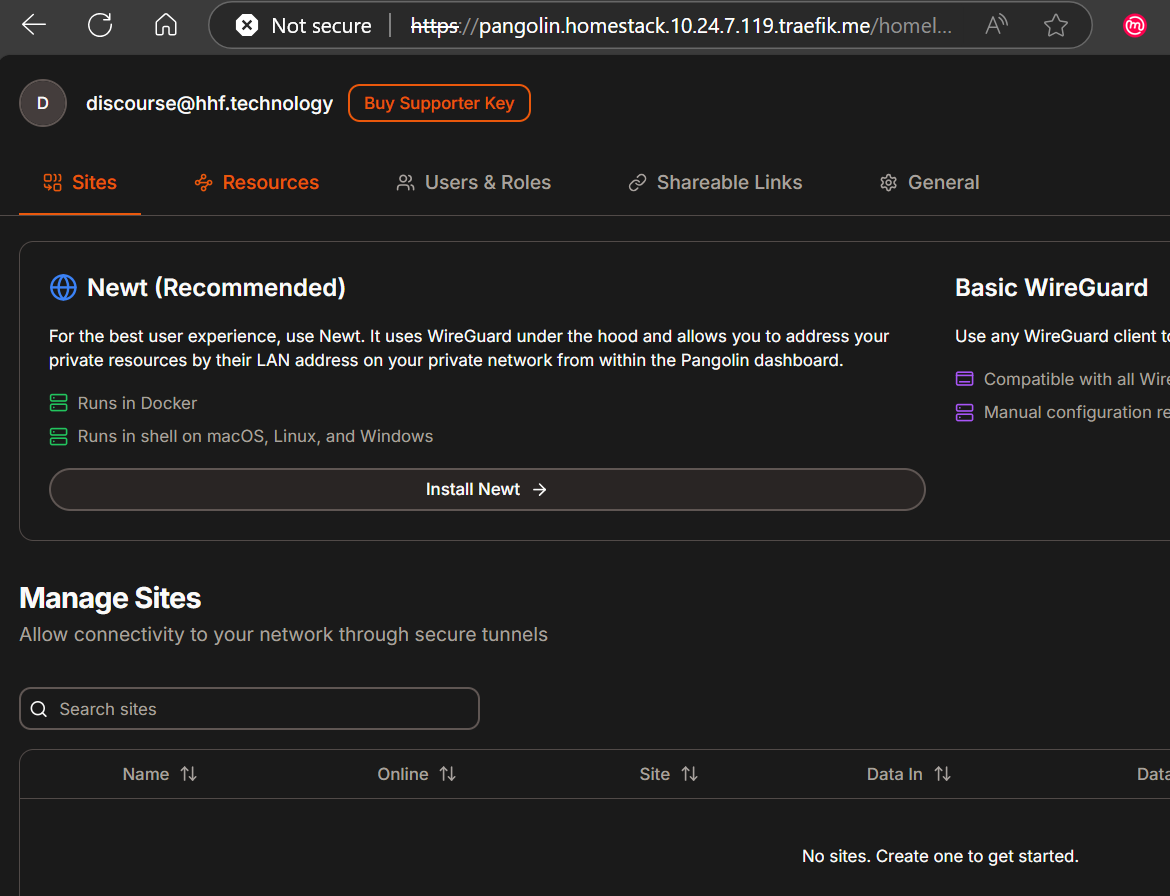
Step 6: Accessing Your Pangolin Dashboard
Once installation is complete, open your browser and navigate to:
https://pangolin.homestack.10.24.7.119.traefik.me
Remember to replace 10.24.7.119 with your actual IP address.
Since we’re using a traefik.me domain without proper SSL certificates, your browser may warn you about an insecure connection. You can proceed anyway for local development purposes.
Step 7: Initial Configuration in Pangolin
-
Log in using the admin credentials you created during installation
-
Create an Organization:
- Click through the initial setup workflow
- Provide a name for your organization
- Set a unique organization ID
-
Create a Local Site:
- Go to the Sites tab and click “Add Site”
- Name your site (e.g., “Local Services”)
- Choose “Local” as the connection method
- Complete the site creation
Step 8: Creating Your First Resource
- Go to the Resources tab and click “Add Resource”
- Enter a name for your resource (e.g., “My Web App”)
- Choose a subdomain (e.g.,
myapp) - Select the local site you created
- After creation, go to the Connectivity page for the resource:
- Keep SSL enabled if desired (although with traefik.me this will be self-signed)
- Add a target with the internal IP and port of your service (e.g.,
http://192.168.1.100:8080)
- Save your changes
Your resource will now be available at:
http://myapp.homestack.10.24.7.119.traefik.me
Troubleshooting
Certificate Issues
Since traefik.me doesn’t fully support Let’s Encrypt validation (due to wildcard domains), you may encounter SSL certificate issues. For local development, you can:
- Use HTTP instead of HTTPS: Disable SSL for resources where security isn’t critical
- Accept self-signed certificates: In your browser, you can proceed past the security warnings
- Configure wildcard certificates: See the Pangolin documentation for setting up wildcard certificates with DNS-01 challenges
Connection Problems
If you can’t connect to your Pangolin dashboard:
- Check Docker status: Ensure containers are running with
docker ps - Verify IP address: Make sure you’re using the correct IP address in your traefik.me domain
- Check firewall settings: Ensure ports 80 and 443 are open on your local machine
- Check logs: Examine logs with
docker compose logs -f
DNS Resolution
If traefik.me domains aren’t resolving:
- Test DNS resolution: Run
nslookup yourdomain.traefik.meto verify DNS is working - Try alternative DNS: Consider using Google’s DNS (8.8.8.8) temporarily
- Ping test: Try
ping yourdomain.traefik.meto check connectivity
Setting Up Your Own DNS Wildcard Service
If you prefer not to use traefik.me or want more control, you can set up your own DNS wildcard service similar to traefik.me. This is useful for:
- Avoiding dependencies on third-party services
- Creating a custom naming scheme
- Ensuring long-term availability
Here’s how to set up your own service using the same code that powers traefik.me:
Deploying Pangolin Locally with a Custom Wildcard DNS Service
In this part, I’ll walk you through how to deploy Pangolin locally without a domain name by setting up your own wildcard DNS service similar to traefik.me. This approach gives you complete control over your development environment and eliminates dependencies on third-party services.
Why Create Your Own Wildcard DNS Service?
While services like traefik.me are convenient, running your own wildcard DNS service offers several advantages:
- Complete control over your DNS infrastructure
- No dependency on third-party services that might change or become unavailable
- Custom domain naming that fits your organization
- Privacy and security benefits from keeping DNS resolution in-house
- An excellent learning opportunity about DNS functionality
Prerequisites
Before we begin, you’ll need:
- A Linux system with root access
- Docker and Docker Compose installed
- Your local IP address (you can find this with
ip addrorifconfig)
Part 1: Setting Up Your Custom Wildcard DNS Service
Let’s start by creating your own DNS service that works just like traefik.me but with your chosen domain name.
Step 1: Clone the traefik.me Repository
git clone https://github.com/pyrou/traefik.me.git
cd traefik.me
Step 2: Create a Custom Configuration File
Edit the configuration file for your DNS service:
/root/traefik.me/nipio/backend.conf
[main]
# main domain
domain=pangolin.local

# default ttl
ttl=3600

# default IP address for non-wildcard entries
ipaddress=127.0.0.1

[acme]
0=-CdKnlQ2MKiDhYWvKizXiztwQ2Prqmc971X0pcg9A2U
1=K2C6AVBf_la7en4vfYsh4l1Wu1aykxhvEsM4dJNtwBk

# SOA
[soa]
# serial number
id=1
# Hostmaster email address
hostmaster=hostmaster@pangolin.local
# Name server
ns=ns1.pangolin.local

# nameservers
[nameservers]
ns1.pangolin.local=127.0.0.1
ns2.pangolin.local=127.0.0.1

# Static resolution
[static]
pangolin.local=127.0.0.1
You can replace pangolin.me with any domain name you prefer for your local setup.
Step 3: Build and Run Your Custom DNS Container
# Build a Docker image
 docker build -t mydns .

# Run the container on port 5353 to avoid conflicts with system DNS
docker run -d --name mydns -p 5353:53/udp -p 5353:53/tcp mydns
Step 4: Test Your Custom DNS Service
Test that your DNS service is working correctly:
# Install dig if not already available
apt-get update && apt-get install -y dnsutils

# Test basic domain resolution
dig @127.0.0.1 -p 5353 pangolin.local

# Test IP-based resolution (replace with your IP)
dig @127.0.0.1 -p 5353 10-24-7-119.pangolin.local
If everything is working, you should see your IP address (10.24.7.119) in the answer section for the second query.
Part 2: Setting Up System-Wide Access with Router Configuration
To make your custom DNS service accessible across your entire network, you’ll need to update your router settings. This will allow all devices on your network to resolve your custom domain names.
Option 1: Configure Your Router’s DNS Settings
Most home routers allow you to configure custom DNS servers:
- Access your router’s admin interface (typically http://192.168.1.1 or http://192.168.0.1)
- Log in with your admin credentials
- Find the DNS settings (usually under “Network Settings,” “WAN Settings,” or “DHCP Settings”)
- Add a conditional forwarder for your custom domain:
- Domain:
pangolin.local(or your chosen domain) - Server: Your server’s IP address (where the DNS container is running)
- Port: 5353
- Domain:
Router interfaces vary widely, so here are brand-specific instructions:
For ASUS Routers
- Go to LAN → DNS Server
- Set up a conditional DNS forwarding for your domain to point to your server
For TP-Link Routers
- Navigate to DHCP Settings or Advanced Routing
- Look for DNS settings or DNS forwarding options
- Add a domain-specific forwarding rule
For Netgear Routers
- Go to Advanced → Setup → WAN Setup
- Look for DNS Address settings
- Some models support conditional forwarding under Advanced → Setup → LAN Setup
Option 2: Use a Secondary Router with Custom DNS
If your primary router doesn’t support conditional forwarding:
- Configure a secondary router with your server as the primary DNS
- Connect devices that need to access your custom domain to this secondary router
Option 3: Configure Pi-hole or AdGuard Home
If you already use Pi-hole or AdGuard Home on your network:
- Configure a conditional forwarding rule for your custom domain
- Point it to your server’s IP address and port 5353
For Pi-hole
- Go to Settings → DNS
- Under “Conditional Forwarding,” add your domain name and server IP:port
For AdGuard Home
- Go to Settings → DNS settings → Upstream DNS servers
- Add a conditional entry:
[/pangolin.local/]127.0.0.1:5353
Option 4: Local DNS Server with Full Control
For advanced users, set up a full DNS server like BIND or dnsmasq that:
- Forwards your custom domain to your wildcard DNS service
- Forwards everything else to your regular DNS servers
- Advertises itself via DHCP to your network
# Example dnsmasq configuration
cat > /etc/dnsmasq.conf <<EOF
# Forward pangolin.local domain to your custom DNS
server=/pangolin.me/127.0.0.1#5353

# Forward all other queries to Google DNS
server=8.8.8.8
server=8.8.4.4

# Listen on all interfaces
interface=*

# Advertise this as DNS server via DHCP
dhcp-option=6,$(hostname -I | awk '{print $1}')
EOF

# Restart dnsmasq
systemctl restart dnsmasq
Part 3: Installing and Configuring Pangolin
Now that your DNS infrastructure is ready, let’s set up Pangolin:
Step 1: Download the Pangolin Installer
# Download the installer
wget -O installer "https://github.com/fosrl/pangolin/releases/download/1.1.0/installer_linux_amd64"

# Make it executable
chmod +x installer
Step 2: Run the Installer
Run the installer with sudo privileges:
sudo ./installer
Step 3: Configure Pangolin with Your Custom Domain
When prompted during installation, enter the following information:
-
Base Domain: Enter your IP-based custom domain
10-24-7-119.pangolin.local(Replace
10-24-7-119with your actual IP address, using dashes instead of dots) -
Dashboard Domain: Enter the subdomain for the Pangolin dashboard
dashboard.10-24-7-119.pangolin.local -
Email for Let’s Encrypt: Enter any valid email address
(Note: You’ll be using self-signed certificates for local development) -
Tunneling: When asked if you want to use Gerbil for tunneling, select
no
(We’re creating a simple reverse proxy setup without tunneling) -
Complete the rest of the setup, including admin user configuration and security settings
Step 4: Access Your Pangolin Dashboard
Once installation is complete, open your browser and navigate to:
http://dashboard.10-24-7-119.pangolin.local
Since you’re using a custom domain with self-signed certificates, your browser may warn you about an insecure connection. You can proceed anyway for local development purposes.
Part 4: Creating Resources in Pangolin
Now you can create resources in Pangolin that use your custom domain:
- Log in to your Pangolin dashboard
- Create an organization and a local site
- Add a resource with a subdomain of your choice
- Configure targets pointing to your internal services
- Access your services using domains like
myapp.10-24-7-119.pangolin.local
Additional Tips and Troubleshooting
Making Your DNS Container Start Automatically
Ensure your DNS container restarts automatically when your server reboots:
# If you didn't include --restart=always when creating the container
docker update --restart=always mydns
HTTPS with Self-Signed Certificates
For development environments, using self-signed certificates is acceptable. In your browser, you can:
- Click “Advanced” when you see the security warning
- Click “Proceed to site” (or similar option in your browser)
- Optionally, add a security exception for this domain
DNS Resolution Testing
To verify that your DNS resolution is working system-wide:
# From your server
dig app.10-24-7-119.pangolin.local @localhost -p 5353

# From other devices on your network
dig app.10-24-7-119.pangolin.local

# Test HTTP connectivity
curl -k https://app.10-24-7-119.pangolin.local
Mobile Device Testing
To test on mobile devices:
- Connect to your Wi-Fi network that uses your custom DNS
- Try accessing your Pangolin resources through the browser
- If needed, add security exceptions for the self-signed certificates
By following this steps, you’ve created a local development environment with:
- A custom wildcard DNS service under your control
- Network-wide access to your development resources
- A fully functional Pangolin installation for managing proxies
This setup gives you the flexibility of services like traefik.me while maintaining complete control over your infrastructure. It’s ideal for development teams, home labs, or any environment where you need convenient access to multiple services without managing individual DNS entries.
For production environments, you would want to:
- Use proper domain names with valid SSL certificates
- Implement additional security measures
- Consider enabling Pangolin’s tunneling features
But for local development or testing, this solution provides an elegant and self-contained approach that you can customize to your specific needs.
Conclusion
Deploying Pangolin locally with traefik.me provides a convenient way to test and use this powerful reverse proxy management tool without requiring a public domain name. This approach is perfect for development environments, home labs, or any situation where you need a quick and simple way to set up Pangolin.
For more advanced setups or production environments, consider:
- Using a proper domain name with valid SSL certificates
- Enabling the Gerbil tunneling feature for secure remote access
- Setting up email functionality for user invitations and notifications
- Implementing additional security measures like CrowdSec
With the knowledge from this guide, you can now leverage Pangolin’s powerful features in your local environment with minimal setup.