Tailscale isn’t only useful for home lab setups. Given the correct configuration and understanding, web developers can use it as a proper replacement for ngrok.
Are you a freelance developer looking for an efficient way to share your work with clients without deploying to a live server? Or perhaps you’re exploring better alternatives to ngrok for exposing your local services? Look no further! In this comprehensive guide, we’ll walk you through using Tailscale Serve and Funnel to deploy a Dockerised WordPress application to your private Tailscale network (AKA a tailnet) or the public internet.
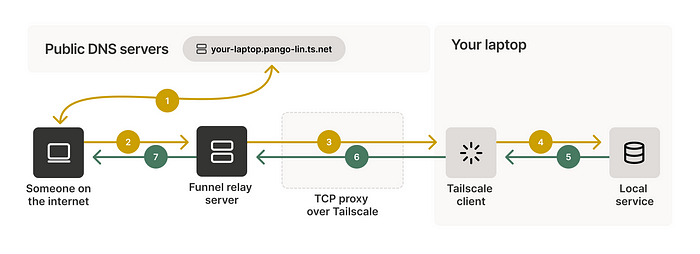
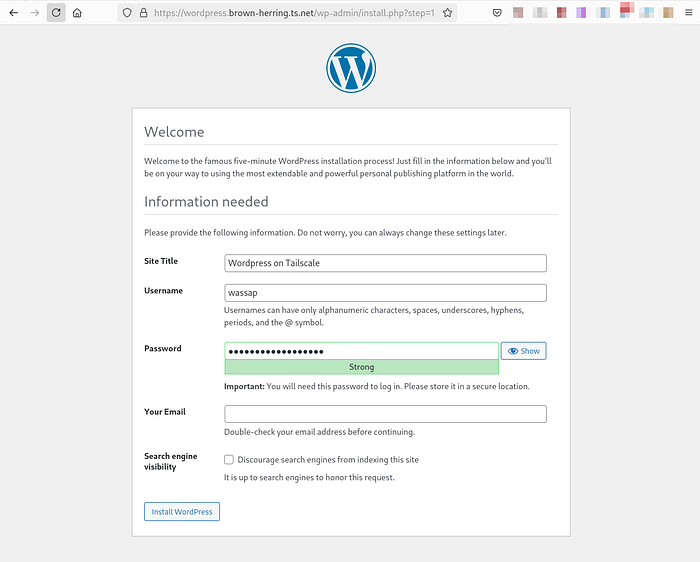
A preview of what you’ll end up with
That’s pretty nifty. And yes, you can configure it to be accessible from exclusively private or public networks.
Before we get started
Before we dive into the setup, let’s quickly highlight why Tailscale is an excellent choice:
- Free to use, unlike ngrok’s paid plans for extended features. You can see for yourself here.
- Perfect for applications requiring static redirect URLs (e.g., OAuth2). Yes, you choose your short hostname (e.g.
wordpress). - It works with any IP protocol (TCP, UDP, etc.), while ngrok only supports TCP.
- Automatic LetsEncrypt certificate management. This is probably the best part.
Some assumptions
- You’re comfortable with bash commands.
- You know what Tailscale is and how it works. It’s not a requirement, but it would be good to install it on your host machine to test how private networking works when Funnel is disabled.
- You have Docker installed and have previous experience running orchestrated containers with
docker compose. - You have some understanding of how TLS/SSL certificates work and the benefits they provide.
Let’s get cracking
Create a new directory for your project and navigate to it:
mkdir wordpress-tailscale && cd wordpress-tailscale
Create the following files in your project directory:
docker-compose.yml
services:
  db:
    image: mysql:8
    container_name: ${COMPOSE_PROJECT_NAME}_db
    volumes:
      - db_data:/var/lib/mysql
    restart: always
    environment:
      MYSQL_ROOT_PASSWORD: somewordpress
      MYSQL_DATABASE: wordpress
      MYSQL_USER: wordpress
      MYSQL_PASSWORD: wordpress

  wordpress:
    depends_on:
      - db
    image: wordpress:6.5.5-php8.1
    container_name: ${COMPOSE_PROJECT_NAME}_wordpress
    volumes:
      - wordpress_data:/var/www/html
    restart: always
    environment:
      WORDPRESS_DB_HOST: db:3306
      WORDPRESS_DB_USER: wordpress
      WORDPRESS_DB_PASSWORD: wordpress
      WORDPRESS_DB_NAME: wordpress

  tailscale:
    image: tailscale/tailscale:latest
    container_name: ${COMPOSE_PROJECT_NAME}_tailscale
    volumes:
      - tailscale_data:/var/lib/tailscale
      - /dev/net/tun:/dev/net/tun
      - ${PWD}/config/tailscale/tailscale-${TAILSCALE_PRIVACY:-private}.json:/config/tailscale.json:ro
    cap_add:
      - NET_ADMIN
      - SYS_MODULE
    environment:
      - TS_AUTHKEY=${TS_AUTHKEY}
      - TS_HOSTNAME=${TS_HOSTNAME}
      - TS_USERSPACE=${TS_USERSPACE:-false}
      - TS_SERVE_CONFIG=${TS_SERVE_CONFIG:-/config/tailscale.json}
      - TS_PRIVACY=${TS_PRIVACY:-private}

  nginx:
    image: nginx:1.27.0
    container_name: ${COMPOSE_PROJECT_NAME}_nginx
    volumes:
      - ./nginx.conf:/etc/nginx/nginx.conf:ro
    depends_on:
      - wordpress
      - tailscale
    restart: always

volumes:
  db_data:
  wordpress_data:
  tailscale_data:
.env
COMPOSE_PROJECT_NAME=wordpress_on_tailscale

TS_AUTHKEY="<get-this-from-tailscale>"
TS_HOSTNAME="wordpress"
TS_PRIVACY=private
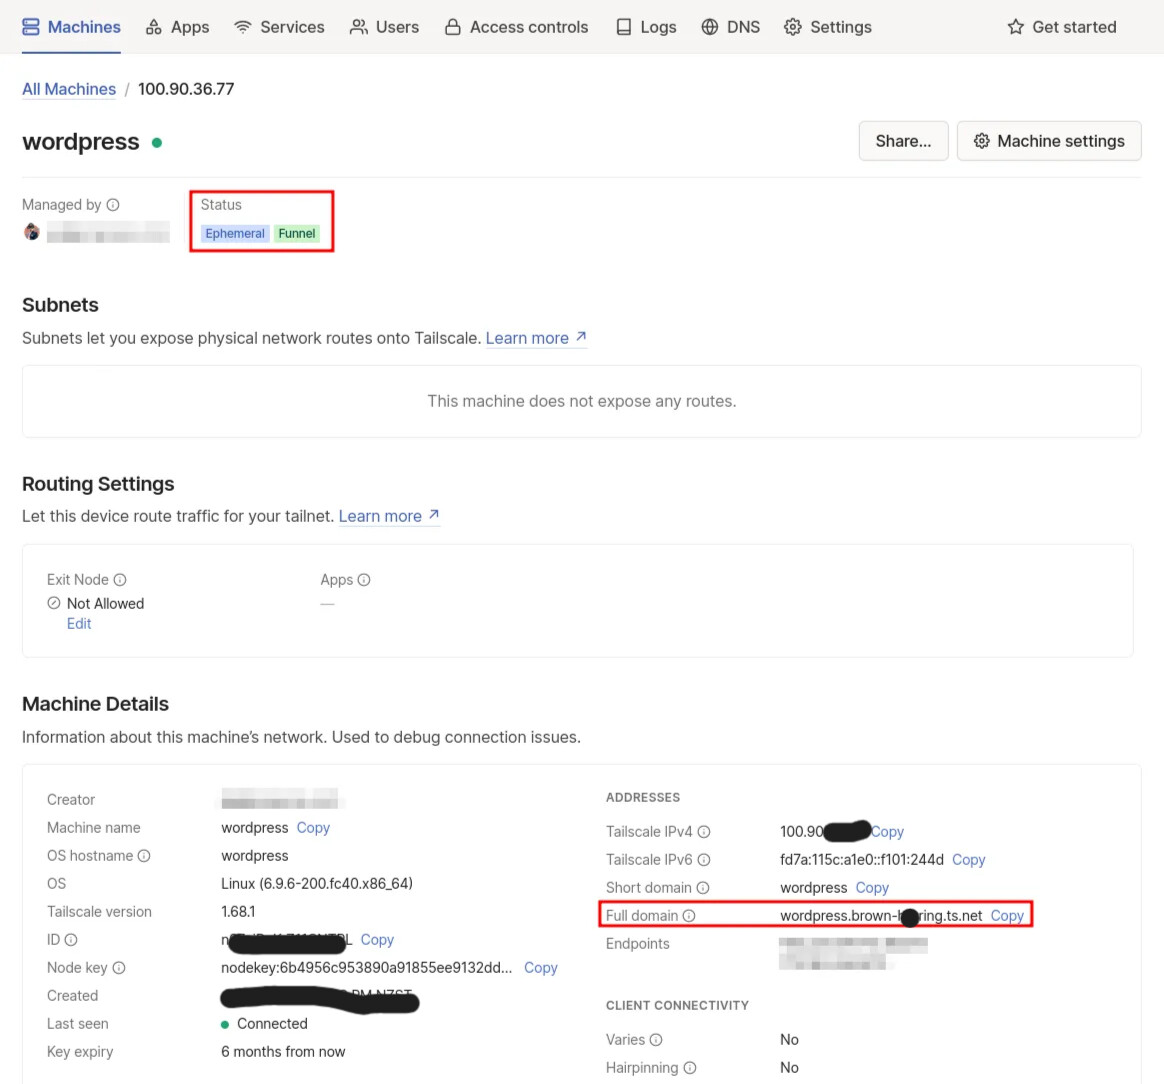
Likewise, with anything on the .env file, you can change wordpress to something different, and it will be the hostname for the lifetime that the Dockerised application is up, e.g. birdpress.brown-herring.ts.net.
Follow this official guide to generate an ephemeral auth key. I stress ephemeral because it’s very likely that you’ll be turning the container off and on multiple times, in which case you want Tailscale to clean up after itself and de-register the hostname on the console when the local application is no longer online.
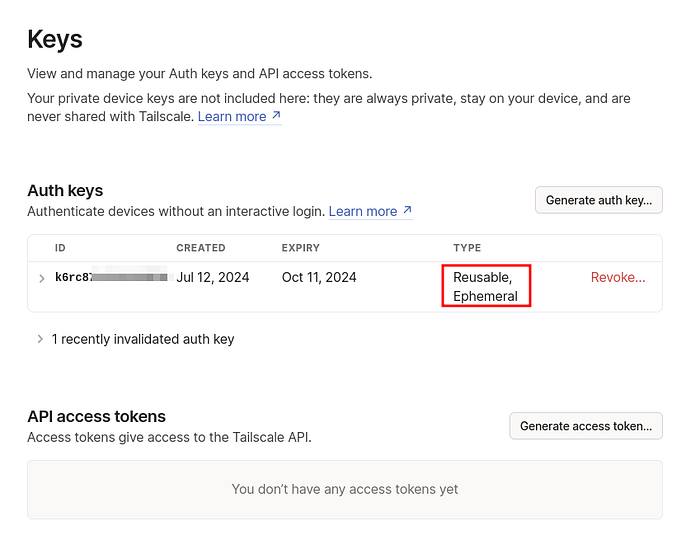
It’s easy to generate an auth key.
nginx.conf
events {
    worker_connections 1024;
}

http {
    server {
        listen 8000;

        # The specific value upgrade-insecure-requests instructs the browser to automatically upgrade all navigational requests from HTTP to HTTPS.
        # This means that if a webpage served over HTTPS includes links or references to resources loaded over HTTP, the browser will attempt to load these resources over HTTPS instead.
        # Wordpress has a lot of resources that are loaded over HTTP, so this is a good way to ensure that all resources are loaded over HTTPS.
        add_header Content-Security-Policy "upgrade-insecure-requests";

        location / {
            proxy_pass http://wordpress:80;
            proxy_set_header Host $host;
            proxy_set_header X-Real-IP $remote_addr;
            proxy_set_header X-Forwarded-For $proxy_add_x_forwarded_for;
            proxy_set_header X-Forwarded-Proto $scheme;
        }
    }
}
config/tailscale/tailscale-private.json
{
  "TCP": {
    "443": {
      "HTTPS": true
    }
  },
  "Web": {
    "${TS_CERT_DOMAIN}:443": {
      "Handlers": {
        "/": {
          "Proxy": "nginx:8000"
        }
      }
    }
  },
  "AllowFunnel": {
    "${TS_CERT_DOMAIN}:443": false
  }
}
config/tailscale/tailscale-public.json
{
  "TCP": {
    "443": {
      "HTTPS": true
    }
  },
  "Web": {
    "${TS_CERT_DOMAIN}:443": {
      "Handlers": {
        "/": {
          "Proxy": "nginx:8000"
        }
      }
    }
  },
  "AllowFunnel": {
    "${TS_CERT_DOMAIN}:443": true
  }
}
Notice that the difference between both .json files is the AllowFunnel directive. Having a value of false means wordpress.brown-herring.ts.net will be accessible only to your tailnet, which is perfect for team-based development. The firewall bit is handled for you!
You should now have a directory structure like this:
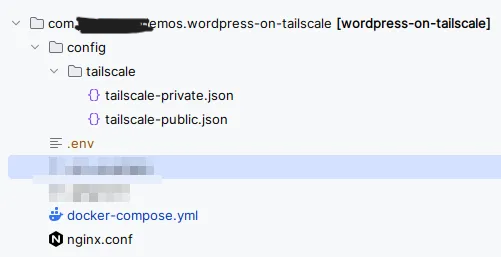
You can see that it only takes a few files to get us off the ground
Publishing the web application
Let’s not waste any time. I know you’re just as excited as I am.
Start the containers:
docker compose up -d
I ran that with:Docker version 27.0.2, build 912c1dd
Wait a few moments while Docker pulls the necessary images and starts the containers. You can monitor the logs with:
docker compose logs -f
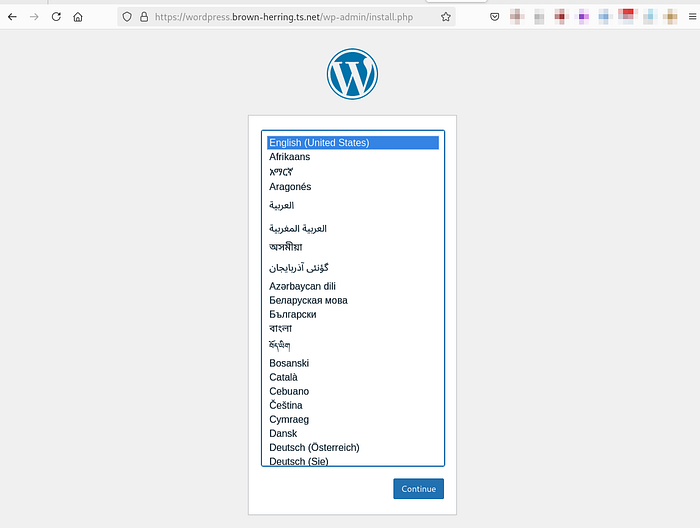
Once the containers are up and running, your WordPress site will be accessible through your Tailscale network (like the screenshot shown at the start of this guide), and you can see the request logs come through:

The logs should update whenever you visit the application.
You can even continue setting up the Wordpress application if you like.
Too easy
Configuring Tailscale Serve and Funnel
Tailscale Serve allows you to expose your service to your private Tailscale network, while Funnel enables public access. The configuration for both is defined in the tailscale.json file, as previously mentioned.
Private Network (Serve)
By default, the setup uses the tailscale-private.json configuration, which only allows access through your Tailscale network. This is why asked you to log your host machine in earlier to join the tailnet. If you aren’t logged in, you won’t be able to see the website.
This also means that if your iPad, iPhone, or any other device are connected to the tailnet, they can see the website.
Public Access (Funnel)
To enable public access, which is what most people are after:
- Update your
.envfile:
TS_PRIVACY=public
2. Restart your containers:
docker compose down --remove-orphans --volumes
docker compose up -d
3. Disconnect from your tailnet or use your grandma’s phone (assuming she’s not on the tailnet) and visit the website to verify that it is publicly available.
You can also check the configuration of your Tailscale service with:
docker compose exec tailscale tailscale serve status --json
Thank you for reading
Using Tailscale Serve and Funnel with Docker provides a powerful and flexible way to deploy and share your WordPress applications. Whether you need private access for your team or public access for clients, this setup offers a secure and efficient solution. As Tailscale continues to evolve, we can expect even more features and improvements in the future. Give it a try and experience the benefits of Tailscale over traditional solutions like ngrok.