Prerequisites : Google account, Google Cloud Console access, and your Pangolin app running locally.
Step 1: Create a Google Cloud Project (Unchanged)
- Go to Google Cloud Console.
- Click project dropdown > New Project > Name it (e.g., “Pangolin OAuth”) > Create.
- Select the project.
Step 2: Enable APIs (Optional)
- APIs & Services > Library > Enable Google+ API if needed for profile data.
Step 3: Create OAuth 2.0 Credentials in Google
- APIs & Services > Credentials > + CREATE CREDENTIALS > OAuth client ID.
- Configure OAuth consent screen (External/Internal, app details, scopes, etc.).
- Select Web application.
- Name it (e.g., “Pangolin Web App”).
- Authorized redirect URIs: Leave blank for now—we’ll add the exact Pangolin path in Step 5.
- Create and copy Client ID & Client Secret.
courtesy - @jhedfors
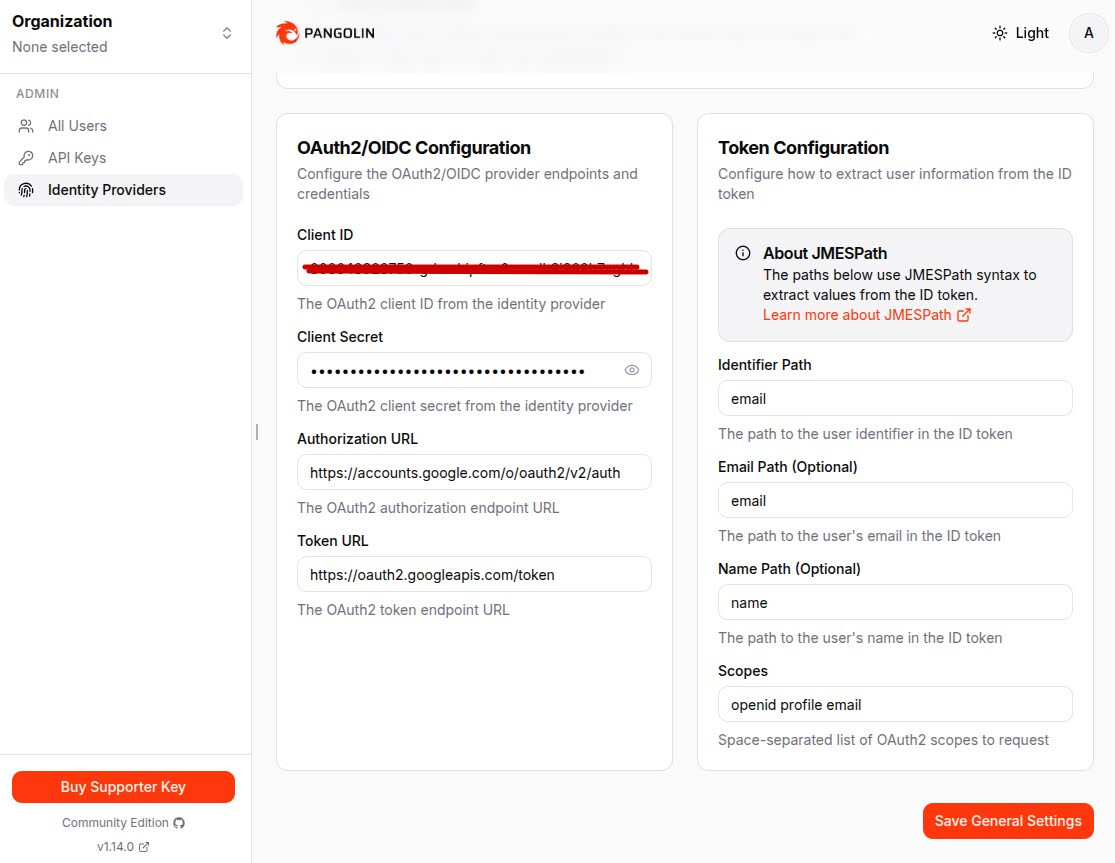
Step 4: Configure the OAuth 2.0 / OIDC Provider in Pangolin Dashboard (Unchanged Core, But Note Path)
- In Pangolin: Identity Providers > Add Provider > OAuth2/OIDC.
- Client ID: Paste from Google.
- Client Secret: Paste from Google.
- Authorization URL:
https://accounts.google.com/o/oauth2/v2/auth - Token URL:
https://oauth2.googleapis.com/token - Token Configuration (JMESPath from ID token):
- Identifier Path:
email - Email Path:
email - Name Path:
name
- Identifier Path:
- Scopes:
openid email profile - Save/Create. Pangolin will generate and display your callback URL:
http://localhost:3000/auth/idp/1/oidc/callback(or your base URL +/auth/idp/1/oidc/callback). Copy this exact full URL—it’s unique to your IDP #1.
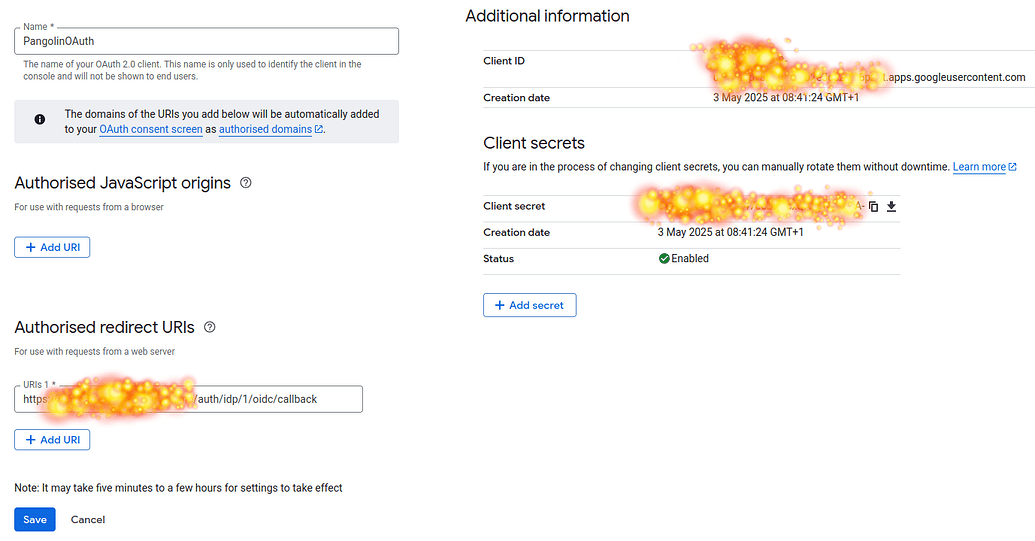
Step 5: Add the Exact Callback URL to Google (Updated for Your Path)
- In Google Cloud Console: APIs & Services > Credentials > [Your Client ID].
- Under Authorized redirect URIs, click + Add URI.
- Paste the full exact URL from Pangolin:
http://localhost:3000/auth/idp/1/oidc/callback- Key Notes on This Path:
- Base URL: Use
http://localhost:3000for local dev (HTTP is allowed here). Switch tohttps://yourdomain.comfor production. - /auth/idp/1/oidc/callback: Don’t modify—
/idp/1is Pangolin’s slot for your first provider (e.g., Google)./oidc/callbackhandles the OIDC token exchange securely. - Exact Match Required: Google rejects mismatches (e.g., no extra
/, wrong casing, or missing/1). If your base changes (e.g., port 8080), regenerate in Pangolin and update here.
- Base URL: Use
- Key Notes on This Path:
- Save. Wait 5–10 minutes for changes to propagate (as per Google’s note).
Step 6: Test the Integration (Updated for Path Verification)
- Start your Pangolin app locally (
http://localhost:3000). - Trigger login (e.g., “Sign in with Google”).
- Flow: App → Google Auth Page → Consent → Redirect to
/auth/idp/1/oidc/callback→ Token exchange → User session with extracted data (sub,email,name). - Verify in Browser/Logs:
- Success: Redirect lands on your app’s post-login page (e.g., dashboard) with Google user info.
- Check URL bar during redirect: Should hit exactly
.../auth/idp/1/oidc/callback?code=...(code is the auth token).
- Troubleshoot Path-Specific Issues:
- redirect_uri_mismatch: Path doesn’t match—re-copy from Pangolin and re-add to Google.
- 404 on Callback: App server not routing to
/auth/idp/1/oidc/callback—check Pangolin routes or restart server. - No Data Extraction: Confirm JMESPath paths (
email, etc.) andopenidscope.
Step 7: Go Live (Production) (Updated for Path)
- Update callback in Pangolin to production base (e.g.,
https://yourapp.com/auth/idp/1/oidc/callback). - Add this exact new URL to Google (remove localhost).
- Authorized JavaScript origins: Add
https://yourapp.comif using client-side auth. - Publish OAuth consent screen.
- Test end-to-end on live domain.
Why This Path is Secure & Reliable (Keeping in Mind)
- Pangolin-Specific: The
/idp/1ensures isolation if you add more providers (e.g., GitHub as/idp/2). It won’t conflict or expose other auths. - OIDC Best Practice: Handles ID token validation automatically—no manual JWT parsing needed in your code.
- Scalable: If you delete/recreate the provider, Pangolin might reassign the number (e.g., to
/idp/2)—just update Google accordingly.