Pangolin Zero-Trust VPN Guide
Complete setup guide for private resource access with real-world examples.
What is Pangolin VPN?
Pangolin 1.13+ introduces Zero-Trust Network Access (ZTNA). Access private resources like SSH, RDP, databases, and entire network ranges through desktop clients on Windows, macOS, and Linux.
This works alongside browser-based reverse proxy. Both use the same Newt site connector.
Key difference from traditional VPN:
- Traditional VPN: Connect to network → access everything
- Pangolin: Connect to network → access only what you’re allowed to
Key Concepts
| Component | Description |
|---|---|
| Site | A remote network with Newt installed. Creates secure tunnel to Pangolin server. |
| Newt | Site connector. Install on any machine in your remote network. No public IP needed. |
| Private Resource | A specific host or network range accessible through the VPN tunnel. |
| Host Resource | Single IP address (e.g., 192.168.1.100) |
| CIDR Resource | Network range (e.g., 10.0.0.0/24 exposes all IPs in that range) |
| DNS Alias | Friendly hostname (e.g., immich.internal) that resolves over the tunnel. |
| Pangolin Client | Desktop app (Windows/Mac/Linux) that connects you to private resources. |
Prerequisites
- Pangolin server running (v1.13.0 or later)
- A Pangolin user account
- A machine in your remote network for Newt
- Pangolin client downloaded on your laptop/desktop
Step 1: Create a Site
A site represents a remote network. You only need one Newt per network.
- Log into Pangolin dashboard
- Go to Sites → Add Site
- Enter a name (e.g., “Home Lab”, “Office Network”)
- Select Newt Tunnel (default)
- Choose install method: Docker Compose or Binary
- Copy the generated credentials
- Click Create Site
Docker Compose Example
services:
  newt:
    image: fosrl/newt
    restart: unless-stopped
    environment:
      - PANGOLIN_ENDPOINT=https://your-pangolin-server.com
      - NEWT_ID=your-newt-id
      - NEWT_SECRET=your-newt-secret
Add Newt to Existing Stack
You can add Newt to any existing docker-compose.yml:
services:
  # Your existing services
  immich-server:
    image: ghcr.io/immich-app/immich-server:release
    # ... immich config

  jellyfin:
    image: jellyfin/jellyfin
    # ... jellyfin config

  # Add Newt to the same stack
  newt:
    image: fosrl/newt
    restart: unless-stopped
    environment:
      - PANGOLIN_ENDPOINT=https://pangolin.yourdomain.com
      - NEWT_ID=abc123
      - NEWT_SECRET=xyz789
Step 2: Create Private Resources
Resources define what you can access through the tunnel.
- Go to Resources → Private
- Click Add Resource
- Enter a name (e.g., “Immich”, “Jellyfin”)
- Select the site connector
- Choose mode: Host or CIDR
- Enter destination IP
- (Optional) Add DNS alias
- Assign users/roles with access
- Click Create Resource
Host vs CIDR Mode
| Host Mode | CIDR Mode |
|---|---|
| Single IP address | Full network range |
Example: 192.168.1.100 |
Example: 192.168.1.0/24 |
| Use for: specific servers | Use for: access entire subnet |
| More secure (least privilege) | More convenient (broader access) |
Step 3: Install Pangolin Client
macOS
- Download
.dmgfrom Downloads | Pangolin - Open and drag to Applications
- Launch Pangolin from Applications
- Click Open System Settings when prompted
- Enable Pangolin under Network Extensions
- Click Allow for VPN configuration
- Enter your Mac password
Windows
- Download
.msifrom Downloads | Pangolin - Run installer
- Launch from Start menu
- Find icon in system tray (bottom right)
Linux (CLI)
curl -fsSL https://pangolin.net/install.sh | sh
Note: Linux may require root privileges for TUN interface creation.
Step 4: Connect to Resources
- Click Pangolin icon (menu bar on Mac, system tray on Windows)
- Click Login
- Select Self-Hosted or Pangolin Cloud
- Enter your server URL (for self-hosted)
- Browser opens → log in with your Pangolin account
- Verify the authentication code matches
- Click Continue and authorize
- Select your organization (if multiple)
- Click Connect
Status indicator: Orange = connected. Now access your resources using their IPs or DNS aliases.
Real-World Examples
Example 1: Immich (Photo Management)
Setup: Immich running at 192.168.1.50:2283
Resource Configuration:
- Name:
Immich - Mode: Host
- Destination:
192.168.1.50 - DNS Alias:
immich.home
Access after connecting:
http://immich.home:2283
# or
http://192.168.1.50:2283
Use case: Access your photo library from anywhere without exposing it to the internet.
Example 2: Jellyfin / Plex (Media Server)
Setup: Jellyfin at 192.168.1.51:8096
Resource Configuration:
- Name:
Jellyfin - Mode: Host
- Destination:
192.168.1.51 - DNS Alias:
jellyfin.home
Access:
http://jellyfin.home:8096
For Plex: Same setup, port 32400
http://plex.home:32400/web
Example 3: Home Assistant
Setup: Home Assistant at 192.168.1.52:8123
Resource Configuration:
- Name:
Home Assistant - Mode: Host
- Destination:
192.168.1.52 - DNS Alias:
ha.home
Access:
http://ha.home:8123
Bonus: Control your smart home from anywhere without cloud dependency.
Example 4: Nextcloud
Setup: Nextcloud at 192.168.1.53:443 (HTTPS)
Resource Configuration:
- Name:
Nextcloud - Mode: Host
- Destination:
192.168.1.53 - DNS Alias:
nextcloud.home
Access:
https://nextcloud.home
Example 5: Vaultwarden (Password Manager)
Setup: Vaultwarden at 192.168.1.54:8080
Resource Configuration:
- Name:
Vaultwarden - Mode: Host
- Destination:
192.168.1.54 - DNS Alias:
vault.home
Access:
http://vault.home:8080
Security note: Keep your password manager private. No public exposure needed.
Example 6: Proxmox / TrueNAS Management
Setup:
- Proxmox at
192.168.1.10:8006 - TrueNAS at
192.168.1.11:443
Resource Configuration (Proxmox):
- Name:
Proxmox - Mode: Host
- Destination:
192.168.1.10 - DNS Alias:
proxmox.home
Resource Configuration (TrueNAS):
- Name:
TrueNAS - Mode: Host
- Destination:
192.168.1.11 - DNS Alias:
truenas.home
Access:
https://proxmox.home:8006
https://truenas.home
Example 7: Grafana + Prometheus Monitoring Stack
Setup:
- Grafana at
192.168.1.60:3000 - Prometheus at
192.168.1.60:9090
Resource Configuration:
- Name:
Monitoring - Mode: Host
- Destination:
192.168.1.60 - DNS Alias:
monitoring.home
Access:
http://monitoring.home:3000  # Grafana
http://monitoring.home:9090  # Prometheus
Example 8: Paperless-ngx (Document Management)
Setup: Paperless at 192.168.1.55:8000
Resource Configuration:
- Name:
Paperless - Mode: Host
- Destination:
192.168.1.55 - DNS Alias:
paperless.home
Access:
http://paperless.home:8000
Example 9: Gitea / Forgejo (Git Server)
Setup: Gitea at 192.168.1.56:3000 (Web) and :22 (SSH)
Resource Configuration:
- Name:
Gitea - Mode: Host
- Destination:
192.168.1.56 - DNS Alias:
git.home
Access:
# Web interface
http://git.home:3000

# Git clone via SSH
git clone git@192.168.1.56:username/repo.git
Example 10: Pi-hole / AdGuard DNS
Setup: Pi-hole at 192.168.1.2:80 (Admin) and :53 (DNS)
Resource Configuration:
- Name:
Pi-hole - Mode: Host
- Destination:
192.168.1.2 - DNS Alias:
pihole.home
Access:
# Admin panel
http://pihole.home/admin

# Use as DNS (in your device settings)
DNS Server: 192.168.1.2
Example 11: SSH to Multiple Servers
Setup: Multiple servers in your network
Option A: Individual Host Resources
Server 1: 192.168.1.100 → ssh.server1.home
Server 2: 192.168.1.101 → ssh.server2.home
Server 3: 192.168.1.102 → ssh.server3.home
Option B: CIDR for entire network
- Mode: CIDR
- Destination:
192.168.1.0/24
Access:
# With individual resources
ssh user@ssh.server1.home

# With CIDR
ssh user@192.168.1.100
ssh user@192.168.1.101
ssh user@192.168.1.102
Key point: One Newt can reach all machines on its network. No need to install anything on target servers.
Example 12: Database Access
Setup:
- PostgreSQL at
192.168.1.70:5432 - MySQL at
192.168.1.71:3306 - Redis at
192.168.1.72:6379
Resource Configuration (each):
- Mode: Host
- Add DNS alias for each
Access:
# PostgreSQL
psql -h postgres.home -p 5432 -U myuser -d mydb

# MySQL
mysql -h mysql.home -P 3306 -u myuser -p

# Redis
redis-cli -h redis.home -p 6379
Use case: Connect database tools (DBeaver, TablePlus, DataGrip) to remote databases.
Example 13: Minecraft / Game Servers
Setup: Minecraft server at 192.168.1.80:25565
Resource Configuration:
- Name:
Minecraft - Mode: Host
- Destination:
192.168.1.80 - DNS Alias:
mc.home
Access: In Minecraft client, connect to:
mc.home:25565
# or
192.168.1.80:25565
Works with: Valheim, Terraria, Factorio, any game server.
Example 14: NAS File Access (SMB/NFS)
Setup: Synology/QNAP NAS at 192.168.1.5
Resource Configuration:
- Name:
NAS - Mode: Host
- Destination:
192.168.1.5 - DNS Alias:
nas.home
Access:
# SMB (Windows/Mac)
\\nas.home\share
# or
smb://nas.home/share

# NFS (Linux)
mount -t nfs nas.home:/volume1/share /mnt/nas
Ports involved: SMB (445), NFS (2049), AFP (548)
Example 15: Development Environment
Setup: Full dev stack on 192.168.1.90
- VS Code Server:
:8443 - Node app:
:3000 - API server:
:8080 - MongoDB:
:27017
Resource Configuration:
- Name:
Dev Server - Mode: Host
- Destination:
192.168.1.90 - DNS Alias:
dev.home
Access:
https://dev.home:8443     # VS Code
http://dev.home:3000      # Frontend
http://dev.home:8080      # API
mongodb://dev.home:27017  # Database
Example 16: Entire Home Lab with CIDR
Setup: All services on 10.0.0.0/24 network
Resource Configuration:
- Name:
Home Lab - Mode: CIDR
- Destination:
10.0.0.0/24
Access everything:
http://10.0.0.50:2283   # Immich
http://10.0.0.51:8096   # Jellyfin
http://10.0.0.52:8123   # Home Assistant
https://10.0.0.10:8006  # Proxmox
ssh user@10.0.0.100     # Any server
Trade-off: Convenient but less granular access control.
Example 17: Docker Host Access
Setup: Docker running on 192.168.1.200
- Portainer:
:9443 - Traefik Dashboard:
:8080 - Docker API:
:2375
Resource Configuration:
- Name:
Docker Host - Mode: Host
- Destination:
192.168.1.200 - DNS Alias:
docker.home
Access:
https://docker.home:9443  # Portainer
http://docker.home:8080   # Traefik
Docker CLI remote access:
export DOCKER_HOST=tcp://docker.home:2375
docker ps
Example 18: Arr Stack (Sonarr, Radarr, etc.)
Setup: Media automation on 192.168.1.85
- Sonarr:
:8989 - Radarr:
:7878 - Prowlarr:
:9696 - qBittorrent:
:8080
Resource Configuration:
- Name:
Arr Stack - Mode: Host
- Destination:
192.168.1.85 - DNS Alias:
arr.home
Access:
http://arr.home:8989   # Sonarr
http://arr.home:7878   # Radarr
http://arr.home:9696   # Prowlarr
http://arr.home:8080   # qBittorrent
Example 19: Uptime Kuma + Monitoring
Setup:
- Uptime Kuma at
192.168.1.95:3001 - Dozzle (Docker logs) at
192.168.1.95:8080
Resource Configuration:
- Name:
Monitoring Tools - Mode: Host
- Destination:
192.168.1.95 - DNS Alias:
status.home
Access:
http://status.home:3001  # Uptime Kuma
http://status.home:8080  # Dozzle
Example 20: Audiobookshelf / Kavita
Setup:
- Audiobookshelf at
192.168.1.88:13378 - Kavita at
192.168.1.88:5000
Resource Configuration:
- Name:
Books - Mode: Host
- Destination:
192.168.1.88 - DNS Alias:
books.home
Access:
http://books.home:13378  # Audiobookshelf
http://books.home:5000   # Kavita
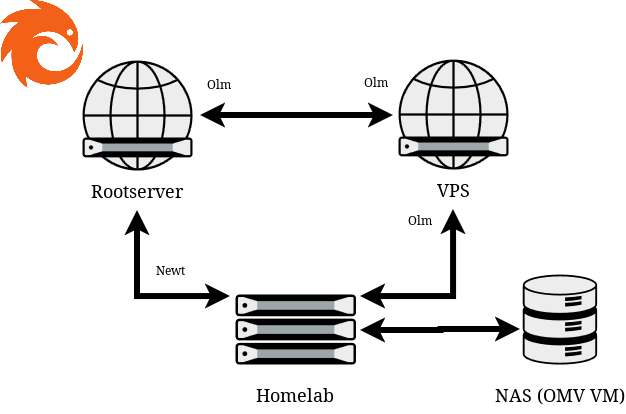
Multi-Site Setup
Scenario: Home + Office + Cloud VPS
Site 1: Home Lab (192.168.1.0/24)
  └── Newt on 192.168.1.5

Site 2: Office (10.0.0.0/24)
  └── Newt on 10.0.0.10

Site 3: Cloud VPS (172.16.0.0/24)
  └── Newt on 172.16.0.1
Setup:
- Create 3 sites in Pangolin
- Install Newt on one machine per network
- Create resources for each site
- Connect with client → access all sites
Result: One VPN connection gives you access to resources across all networks.
Access Control
User-Based Access
- Add specific users to a resource
- Only those users can access when connected
- Example: Only give database access to developers
Role-Based Access
- Create roles (e.g., “Developers”, “Family”, “Guests”)
- Assign roles to resources
- All users with that role get access
Example setup:
Role: Family
  └── Immich, Jellyfin, Nextcloud

Role: Developers
  └── All above + SSH, Databases, Portainer

Role: Guests
  └── Jellyfin only
Network Topology
┌─────────────────┐     ┌───────────────────┐
│  Your Laptop    │     │  Pangolin Server  │
│  (Client App)   │◄───►│  (Cloud/Self-host)│
└─────────────────┘     └─────────┬─────────┘
                                  │
                    ┌─────────────┴─────────────┐
                    ▼                           ▼
          ┌─────────────────┐         ┌─────────────────┐
          │   Home Site     │         │   Office Site   │
          │  (Newt running) │         │  (Newt running) │
          └────────┬────────┘         └────────┬────────┘
                   │                           │
     ┌─────────────┼─────────────┐            │
     ▼             ▼             ▼            ▼
┌────────┐   ┌────────┐   ┌────────┐   ┌────────────┐
│ Immich │   │Jellyfin│   │  NAS   │   │Dev Servers │
│10.0.0.5│   │10.0.0.6│   │10.0.0.7│   │ 10.1.0.x   │
└────────┘   └────────┘   └────────┘   └────────────┘
Troubleshooting
Site shows “Offline”
- Check if Newt container/process is running
- Verify
PANGOLIN_ENDPOINT,NEWT_ID,NEWT_SECRETare correct - Check firewall allows outbound connections
- Check Docker logs:
docker logs newt
Client won’t connect
- Ensure VPN configuration is allowed (system settings)
- Try restarting the Pangolin client
- Check your server URL is correct (include
https://) - On Mac: Check System Settings → Network Extensions
Can’t reach resource
- Verify resource IP is correct
- Check you have access (user/role assigned)
- Confirm Newt can reach the target IP on the local network
- Test from Newt host:
ping 192.168.1.50 - For CIDR: make sure IP is within the defined range
DNS alias not resolving
- Ensure client is connected (status shows orange)
- Try using IP address directly to test connectivity
- Flush local DNS cache:
# macOS
sudo dscacheutil -flushcache

# Windows
ipconfig /flushdns

# Linux
sudo systemd-resolve --flush-caches
Slow connection
- Check if NAT hole punching succeeded (direct connection)
- Relay mode is slower but more reliable
- Check network quality on both ends
Quick Reference
| Action | How To |
|---|---|
| Add new site | Sites → Add Site → Copy credentials → Run Newt |
| Add resource | Resources → Private → Add Resource |
| Grant access | Edit resource → Add users/roles |
| Check site status | Sites page → Look for “Online” status |
| Switch organization | Client menu → Select different org |
| View connection status | Client icon → Orange = connected |
Common Port Reference
| Service | Default Port |
|---|---|
| Immich | 2283 |
| Jellyfin | 8096 |
| Plex | 32400 |
| Home Assistant | 8123 |
| Nextcloud | 443 |
| Vaultwarden | 8080 |
| Proxmox | 8006 |
| TrueNAS | 443 |
| Grafana | 3000 |
| Portainer | 9443 |
| Pi-hole | 80 |
| Paperless-ngx | 8000 |
| Gitea | 3000 |
| Sonarr | 8989 |
| Radarr | 7878 |
| PostgreSQL | 5432 |
| MySQL | 3306 |
| Redis | 6379 |
| SSH | 22 |
| SMB | 445 |
| RDP | 3389 |
Best Practices
- Use Host mode for specific services - More secure, explicit access
- Use CIDR for dev/test environments - Convenience over granularity
- Set DNS aliases - Easier to remember than IPs
- Create roles - Manage access at scale
- One Newt per network - Don’t install on every machine
- Keep Newt updated -
docker pull fosrl/newtregularly - Document your resources - Use clear naming conventions