Self-Host Your Email: Stalwart on Raspberry Pi with a Pangolin VPS Proxy
A guide to creating a private, self-hosted email server! This post will walk you through setting up the powerful Stalwart Mail Server on a low-cost Raspberry Pi at home. To make it securely accessible from anywhere, we’ll use Pangolin on a Virtual Private Server (VPS) to create a secure tunnel, bypassing the need for complex firewall rules or a static home IP address.
Part 1: Setting Up Stalwart Mail Server on Your Raspberry Pi
First, we’ll get the mail server software running on your Pi.
Step 1.1: Install Docker & Pull Stalwart
Stalwart runs in a clean, isolated environment called a Docker container.
-
Install Docker on your Raspberry Pi if you haven’t already. The easiest way is to run their official script:
curl -fsSL https://get.docker.com -o get-docker.sh sudo sh get-docker.sh -
Add your user to the Docker group to avoid typing
sudofor every Docker command:sudo usermod -aG docker ${USER}You’ll need to log out and log back in for this change to take effect.
-
Pull the Stalwart Docker image from the internet. This downloads the software.
docker pull stalwartlabs/stalwart:latest
Step 1.2: Create a Home for Your Mail Data
You need a dedicated folder on your Raspberry Pi to store all your emails and configuration files.
mkdir /var/lib/stalwart
Step 1.3: Run Stalwart for the First Time
Now, we’ll start the Stalwart container.
-
Run the following command. Note that we are NOT exposing the ports with
-pflags yet. Pangolin will handle that for us later.docker run -d -ti \ -v /var/lib/stalwart:/opt/stalwart \ --name stalwart stalwartlabs/stalwart:latest-d: Runs the container in the background.-v: Links the/var/lib/stalwartdirectory on your Pi to the/opt/stalwartdirectory inside the container.--name stalwart: Gives the container a memorable name.
-
Get your admin password. Stalwart generates a one-time password for you.
docker logs stalwartLook for a line that says:
🔑 Your administrator account is 'admin' with password 'xxxxxxxxxx'.
Copy this password! You’ll need it in the next step.
Step 1.4: First-Time Login & Setup
-
Find your Raspberry Pi’s local IP address. You can use the command
ip aand look for theinetaddress under theeth0(wired) orwlan0(Wi-Fi) section. It will look something like192.168.1.123. -
From another computer on the same network, open a web browser and go to:
http://<YOUR_PI_IP_ADDRESS>:8080/login -
Log in with the username
adminand the password you copied. -
Configure Storage: For now, the default RocksDB is perfectly fine. You can skip the
Settings > Storagesection.
Step 1.5: Configure Your Domain & Network
This is the most critical part of the setup.
- Navigate to Settings > Server > Network.
- Set the Server Hostname to what your public mail server will be. For example,
mail.yourdomain.com. - Click Save changes.
- Navigate to Management > Directory > Domains.
- Click Add Domain and enter your main domain name (e.g.,
yourdomain.com). - Crucially, do NOT set up TLS or ACME (Let’s Encrypt) inside Stalwart. Your Pangolin VPS will handle all the SSL/TLS certificates for you.
Step 1.6: Add Your First Email Account
- Go to Management > Directory > Accounts.
- Click Add Account and create your first email address (e.g.,
myname@yourdomain.com). Set a strong password.
Step 1.7: Restart the Container
Apply all the changes by restarting the Stalwart container.
docker restart stalwart
Your mail server is now running on your Pi! Next, we’ll make it accessible to the world.
Part 2: Building the Secure Tunnel with Pangolin
Now we switch to your VPS and Pangolin dashboard.
Step 2.1: Connect Your Raspberry Pi to Pangolin
- In your Pangolin web dashboard, go to Sites and click Add Site.
- Give it a name, like
Raspberry Pi Home. - Click Create Site. Pangolin will generate a
newtcommand. - On your Raspberry Pi, run the
newtcommand that Pangolin gave you. This creates the secure tunnel from your Pi to the VPS.
Step 2.2: Expose the Stalwart Web Admin Panel
Let’s make the admin panel accessible through your domain.
- In Pangolin, go to Resources and click Add Resource.
- Fill out the form:
- Name:
Stalwart Admin - Site: Select
Raspberry Pi Home. - Resource Type:
HTTP Resource. - HTTP Settings > Sub-domain:
stalwart(or whatever you prefer). This will be accessible atstalwart.yourdomain.com.
- Name:
- Click Create Resource.
- On the next page, under Target Configuration:
- Method:
http - Host: Your Raspberry Pi’s local IP address (e.g.,
192.168.1.123). - Port:
8080
- Method:
- Click Add Target and then Save Targets.
You can now access your Stalwart admin panel at https://stalwart.yourdomain.com!
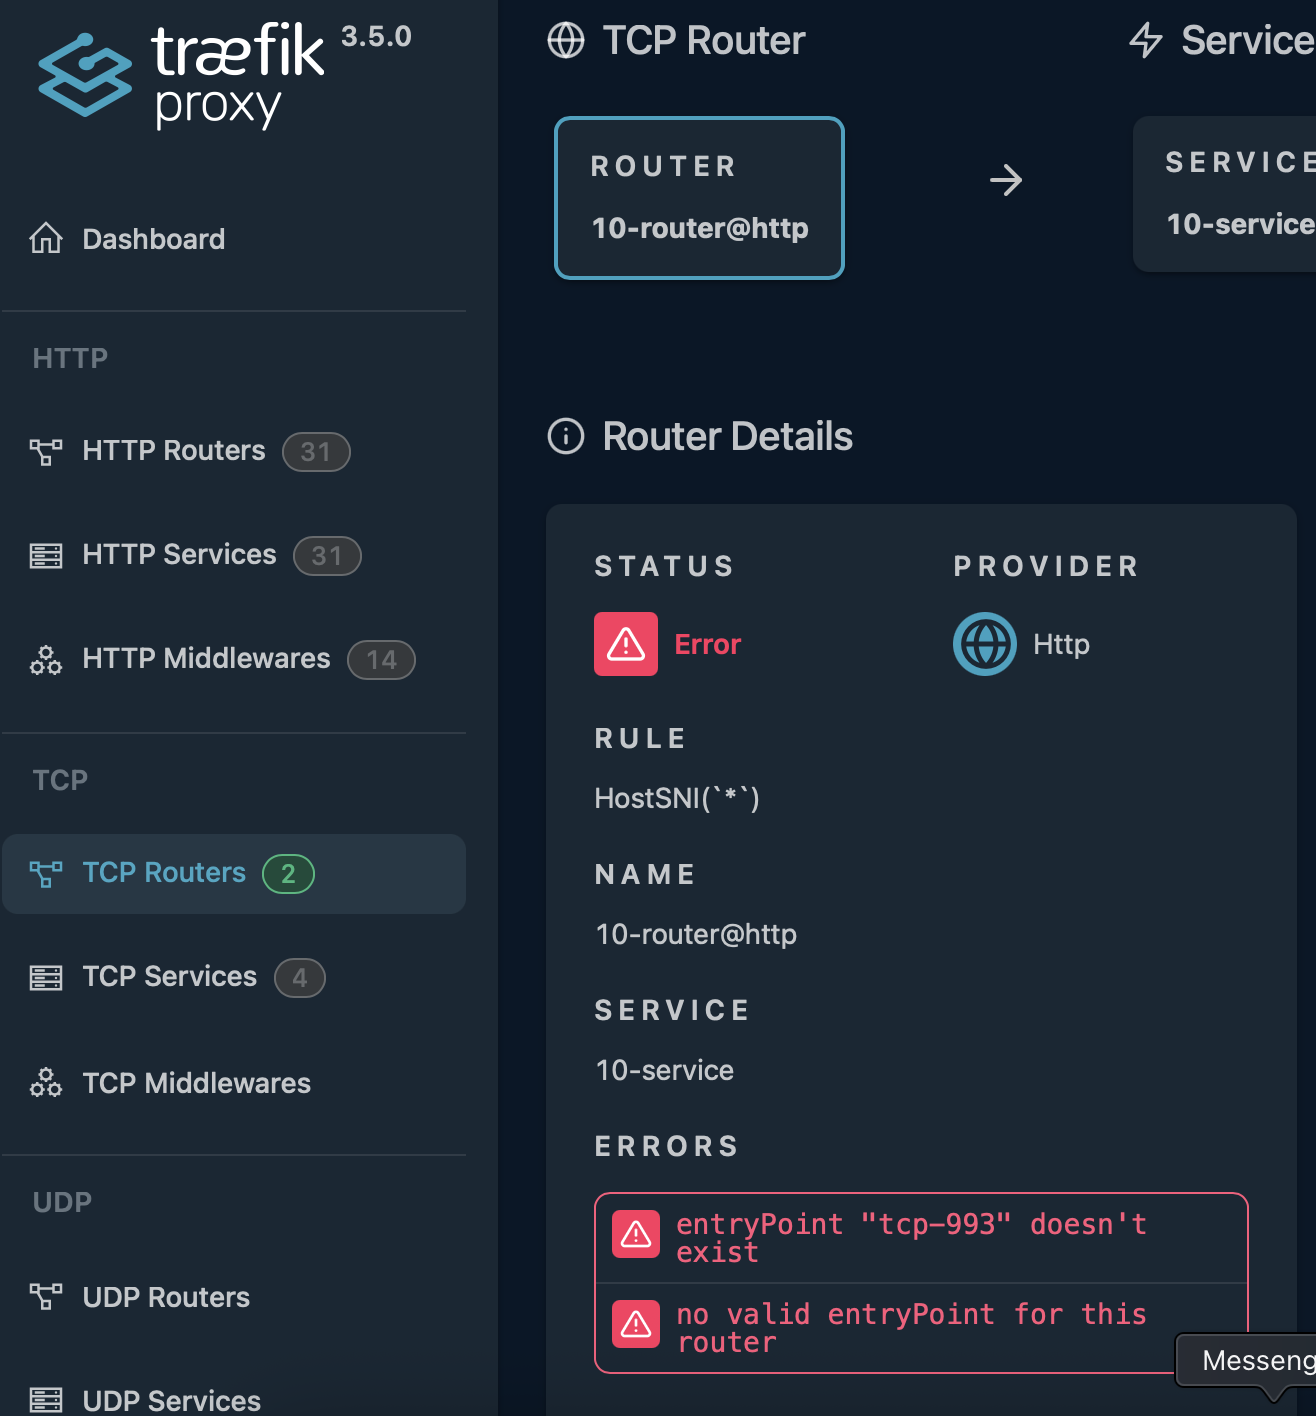
Step 2.3: Expose Your Mail Ports (IMAP & SMTP)
These ports allow your email clients (like on your phone or computer) to connect. We will use the secure versions of these protocols.
-
Expose Secure IMAP (Port 993):
- In Pangolin, go to Resources and click Add Resource.
- Name:
Stalwart IMAPS - Site:
Raspberry Pi Home - Resource Type:
TCP & UDP Resource - Forwarded Port on Server:
993(for incoming connections) - Protocol:
TCP - Click Create Resource.
- Under Target Configuration:
- Host: Your Raspberry Pi’s local IP address.
- Port:
993
- Click Add Target and Save Targets.
-
Expose Secure SMTP (Port 465):
- Go to Resources and click Add Resource again.
- Name:
Stalwart SMTPS - Site:
Raspberry Pi Home - Resource Type:
TCP & UDP Resource - Forwarded Port on Server:
465 - Protocol:
TCP - Click Create Resource.
- Under Target Configuration:
- Host: Your Raspberry Pi’s local IP address.
- Port:
465
- Click Add Target and Save Targets.
Part 3: Finalizing DNS and Testing
The final step is to tell the world’s email servers how to find you.
Step 3.1: Set Up Your DNS Records
- Go back to your Stalwart admin panel (Management > Directory > Domains and click on your domain). Stalwart shows you the exact DNS records you need.
- Log in to your domain registrar (where you bought
yourdomain.com). - Add the records provided by Stalwart. The most important one is the MX record. It should point to the hostname you set up earlier:
- Type:
MX - Name:
@oryourdomain.com - Value/Points to:
mail.yourdomain.com - Priority:
10
- Type:
- Add the
TXTrecords for SPF, DKIM, and DMARC. These are vital for preventing your emails from being marked as spam. Just copy and paste them exactly as Stalwart shows them. - Finally, ensure you have an A record that points
mail.yourdomain.comto your VPS IP address.- Type:
A - Name:
mail - Value:
YOUR_VPS_IP_ADDRESS
- Type:
Step 3.2: Configure Your Email Client
Now for the moment of truth! Open your favorite email client (Thunderbird, Apple Mail, Outlook) and add a new account.
- Incoming Server (IMAP):
- Server:
mail.yourdomain.com - Port:
993 - Connection Security:
SSL/TLS
- Server:
- Outgoing Server (SMTP):
- Server:
mail.yourdomain.com - Port:
465 - Connection Security:
SSL/TLS
- Server:
- Username: Your full email address (
myname@yourdomain.com) - Password: The password you set for the account in Stalwart.
Your client should connect, and you can now send and receive emails from your very own private server!