Implementing External Authentication in Pangolin with Authentik and Middleware Manager
In this guide, we’ll walk through how to integrate Authentik with Pangolin using the Middleware Manager to enable external authentication for your self-hosted HTTP resources.
This guide assumes you have already deployed Pangolin with Middleware Manager enabled as outlined in this article. Please note, this guide is not intended to be a fully production ready deployment. It is just a proof of concept to show Authentik (version 2025.2.4) working with forwardAuth
Forward Auth

Forward Auth is a straightforward concept. In this method, our proxy server Traefik, works with Authentik to secure requests to the applications. Before we sign in, the proxy server directs us to the Authentik site. After signing in, the proxy server forwards the requests directly to the applications, embedding details like usernames in the HTTP headers. The applications can rely on these headers to identify our account.
Prerequisites
- Authentik deployed and accessible at a public URL (e.g.,
http://www.mydomain.com:9000) - Pangolin running with Middleware Manager enabled
- A public domain/subdomain pointing to your Pangolin instance
- A simple web app running on a subdomain (e.g.,
https://resourcename.mydomain.com) with no built-in auth
Demo Setup
![]() Note: For demonstration purposes, I deployed Authentik on an externally facing VPS using Docker, following Authentik’s official Docker Compose setup guide.
Note: For demonstration purposes, I deployed Authentik on an externally facing VPS using Docker, following Authentik’s official Docker Compose setup guide.
While this setup uses plain HTTP and is publicly accessible, it’s intentionally simplified for testing and educational use.
This is not recommended for production. In a real deployment, you should follow best practices—use HTTPS, restrict access, and consider placing Authentik behind a secure reverse proxy. Your deployment architecture will vary depending on your environment and security requirements.
docker compose changes
I added the following to my pangolin docker compose. The credentials are stored in .env file
services:
  postgresql:
    image: docker.io/library/postgres:16-alpine
    container_name: authentik-postgresql
    restart: unless-stopped
    healthcheck:
      test: ["CMD-SHELL", "pg_isready -d $${POSTGRES_DB} -U $${POSTGRES_USER}"]
      start_period: 20s
      interval: 30s
      retries: 5
      timeout: 5s
    volumes:
      - database:/var/lib/postgresql/data
    env_file:
      - .env
    environment:
      - POSTGRES_PASSWORD=${POSTGRES_PASSWORD}
      - POSTGRES_USER=${POSTGRES_USER}
      - POSTGRES_DB=${POSTGRES_DB}
  redis:
    image: docker.io/library/redis:alpine
    container_name: authentik-redis
    command: --save 60 1 --loglevel warning
    restart: unless-stopped
    healthcheck:
      test: ["CMD-SHELL", "redis-cli ping | grep PONG"]
      start_period: 20s
      interval: 30s
      retries: 5
      timeout: 3s
    volumes:
      - redis:/data
  server:
    image: ghcr.io/goauthentik/server:2024.2.2
    container_name: authentik-server
    restart: unless-stopped
    command: server
    env_file:
      - .env
    environment:
      - AUTHENTIK_SECRET_KEY=${AUTHENTIK_SECRET_KEY}
      - AUTHENTIK_REDIS__HOST=redis
      - AUTHENTIK_POSTGRESQL__HOST=postgresql
      - AUTHENTIK_POSTGRESQL__USER=${AUTHENTIK_POSTGRESQL__USER}
      - AUTHENTIK_POSTGRESQL__NAME=${AUTHENTIK_POSTGRESQL__NAME}
      - AUTHENTIK_POSTGRESQL__PASSWORD=${AUTHENTIK_POSTGRESQL__PASSWORD}
    volumes:
      - ./media:/media
      - ./custom-templates:/templates
    ports:
      - "${COMPOSE_PORT_HTTP:-9000}:9000"
      - "${COMPOSE_PORT_HTTPS:-9443}:9443"
    depends_on:
      postgresql:
        condition: service_healthy
      redis:
        condition: service_healthy
  worker:
    image: ghcr.io/goauthentik/server:2024.2.2
    container_name: authentik-worker
    restart: unless-stopped
    command: worker
    env_file:
      - .env
    environment:
      - AUTHENTIK_SECRET_KEY=${AUTHENTIK_SECRET_KEY}
      - AUTHENTIK_REDIS__HOST=redis
      - AUTHENTIK_POSTGRESQL__HOST=postgresql
      - AUTHENTIK_POSTGRESQL__USER=${AUTHENTIK_POSTGRESQL__USER}
      - AUTHENTIK_POSTGRESQL__NAME=${AUTHENTIK_POSTGRESQL__NAME}
      - AUTHENTIK_POSTGRESQL__PASSWORD=${AUTHENTIK_POSTGRESQL__PASSWORD}
    user: root
    volumes:
      - /var/run/docker.sock:/var/run/docker.sock
      - ./media:/media
      - ./certs:/certs
      - ./custom-templates:/templates
    depends_on:
      postgresql:
        condition: service_healthy
      redis:
        condition: service_healthy

volumes:
  database:
    driver: local
  redis:
    driver: local
I included the following in my .env file
POSTGRES_PASSWORD=INSERTPASSWORDHERE
POSTGRES_USER=admin
POSTGRES_DB=authentik-db
AUTHENTIK_SECRET_KEY=INSERTSECRETKEYHERE
AUTHENTIK_ERROR_REPORTING__ENABLED=true
AUTHENTIK_POSTGRESQL__USER=admin
AUTHENTIK_POSTGRESQL__NAME=authentik-db
AUTHENTIK_POSTGRESQL__PASSWORD=INSERTPASSWORDHERE
Pangolin Resource
I’ll use a sample resource, resourcename.mydomain.com, to demonstrate how to secure it using Authentik via forward authentication. My pangolin resource is a https resource that maps to a target running locally on my internal network (a simple python http server). Please note, you MUST DISABLE “Use Platform SSO” in the resource’s authentication configuration on Pangolin. We will use the forwardauth middleware instead.
1. Create a User in Authentik
I assumed that you have created the initial setup at ( http://<your server's IP or hostname>:9000/if/flow/initial-setup/)
- Log into the Authentik Admin Interface (in my case its on my VPS domain and port 9000
http://www.mydomain.com:9000 - Go to Directory > Users.
- Create a new user (internal).
- Edit the newly created user by clicking on the user name
- Scroll down and manually set a password by selecting the user and clicking Set Password.
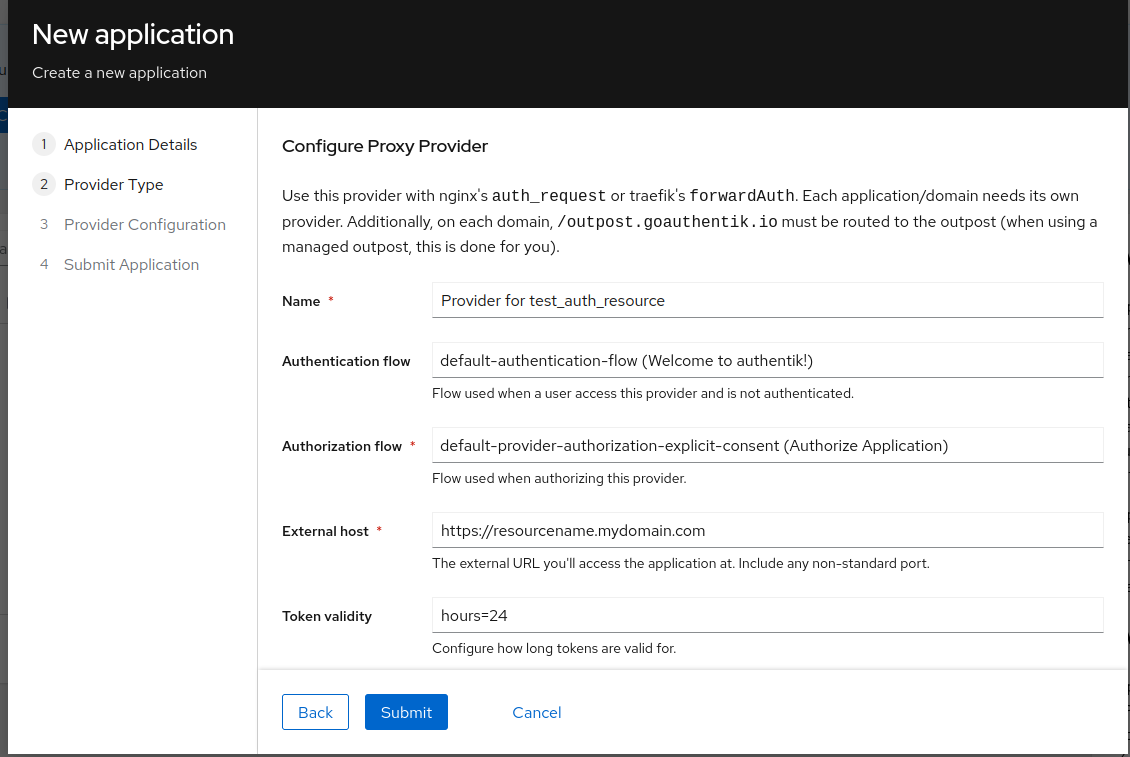
2. Create a Forward Auth Application in Authentik
- Navigate to Applications.
- Click Create With Provider.
- Name the application
test_auth_resource. - In UI Settings, set the Launch URL to
https://resourcename.mydomain.com. - Select ** Proxy Provider** as the Provider Type. Note: this was previously called Forward Auth (Single Application)
- Leave the default name as “Provider for test_auth_resource”
- Leave the default Authentication and Authorization flows (default-provider-authorization-explicit-consent (Authorize Application)).
- Select Forward Auth (Single Application) and then Set External Host to your app’s public URL (e.g.,
https://resourcename.mydomain.com). - Click through the remaining defaults and Submit the form.
Your form should look like this before you submit it
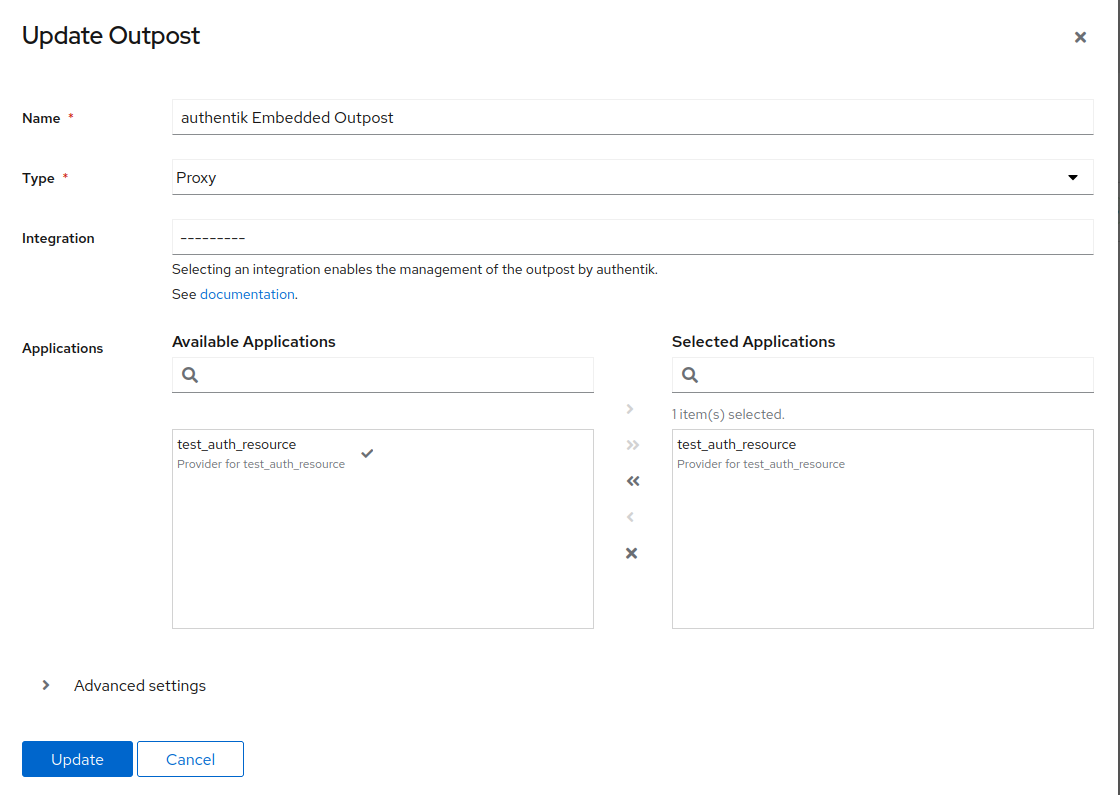
3. Connect the Application to an Outpost
- Go to the Outposts tab in Authentik.
- Click the pencil icon beside authentik Embedded Outpost.
- Under Applications, select the “test_auth_resource” from Available Applications and move it to Selected Applications by clicking the arrows.
- click Update.
3.1. Deploying Authentik on a separate host to Pangolin and the Middleware manager
If you have decided to deploy the Authentication server on a totally separate host then there are some additional steps you will need to do:
-
You will need to add a new outpost in Authentik. Hit View and copy the token
-
You will then need to create a docker services for the outpost proxy in your local docker compose file. Add this to your docker compose
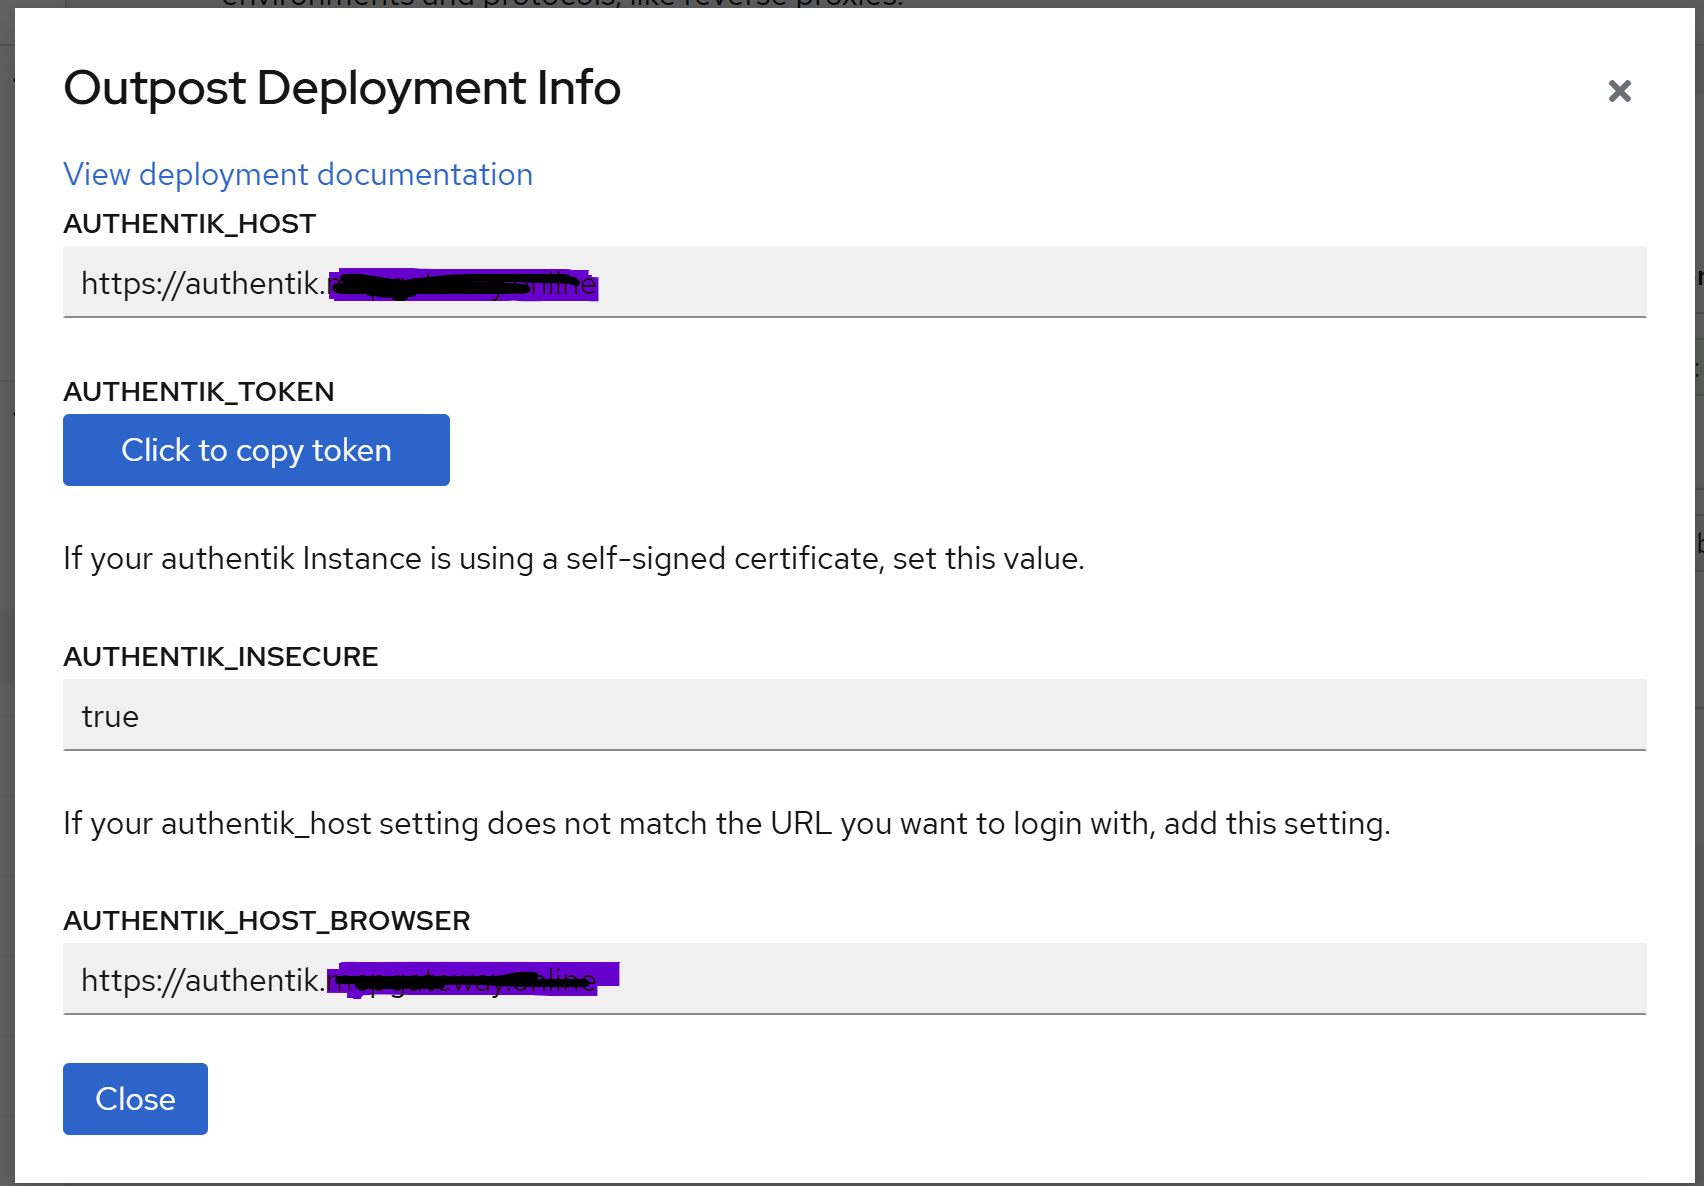
  authentik-proxy:
    image: ghcr.io/goauthentik/proxy
    container_name: authentik-proxy
    ports:
        - 9000:9000
        - 9443:9443
    environment:
        AUTHENTIK_HOST: https://authentik.yourdomain.com
        AUTHENTIK_INSECURE: "false"
        AUTHENTIK_TOKEN: REPLACE_WITH_YOUR_TOKEN
        # Starting with 2021.9, you can optionally set this too
        # when authentik_host for internal communication doesn't match the public URL
        # AUTHENTIK_HOST_BROWSER: https://external-domain.tld
    labels:
        traefik.enable: true
        traefik.port: 9000
        traefik.http.routers.authentik.rule: Host(authentik.yourdomain.com`) && PathPrefix(`/outpost.goauthentik.io/`)
        # `authentik-proxy` refers to the service name in the compose file.
        traefik.http.middlewares.authentik.forwardauth.address: http://authentik-proxy:9000/outpost.goauthentik.io/auth/traefik
        traefik.http.middlewares.authentik.forwardauth.trustForwardHeader: true
        traefik.http.middlewares.authentik.forwardauth.authResponseHeaders: X-authentik-username,X-authentik-groups,X-authentik-entitlements,X-authentik-email,X-authentik-name,X-authentik-uid,X-authentik-jwt,X-authentik-meta-jwks,X-authentik-meta-outpost,X-authentik-meta-provider,X-authentik-meta-app,X-authentik-meta-version
- Bring up with docker service using
docker compose up authentik-proxy - From now on you can use your external authentication host name (e.g. authentik.yourdomain.com) and the proxy will communicate with your external authentication server.
4. Config Traefik to Support Forward Auth using middleware-manager
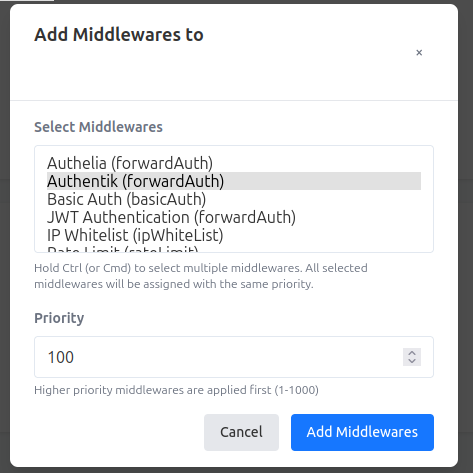
- Go to the Pangolin Middleware Manager
- Go to Middlewares tab at the top and edit “Authentik”
- In the json configuration change the address to be the address of your authentik server
{
  "address": "http://www.mydomain.com:9000/outpost.goauthentik.io/auth/traefik",
  "authResponseHeaders": [
    "X-authentik-username",
    "X-authentik-groups",
    "X-authentik-email",
    "X-authentik-name",
    "X-authentik-uid"
  ],
  "trustForwardHeader": true
}
- Select **Update Middleware" and go back to the dashboard
- Click Manage on the resource that you want to protect with forward auth
resourcename.mydomain.com - Under the Attached Middlewares select the **Add Middleware"
- Select "Authentik (forwardAuth)
- Click **Add Middlewares"
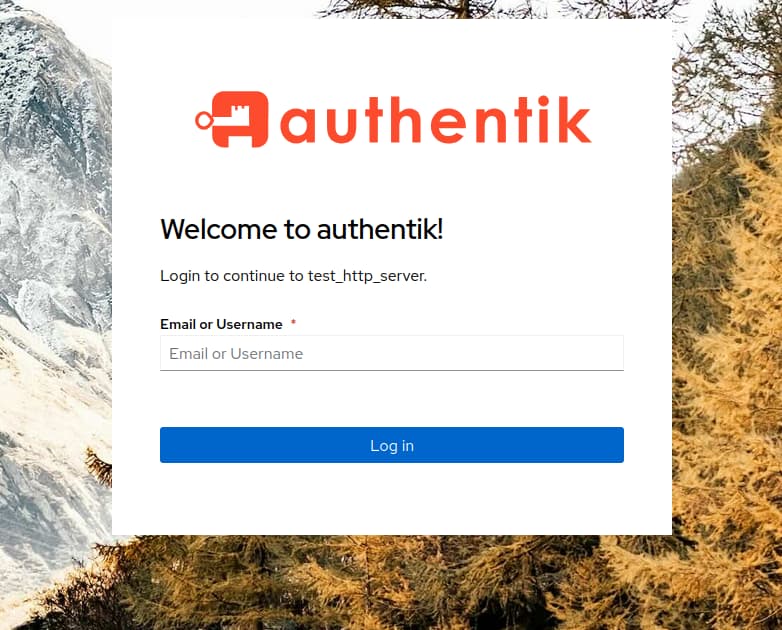
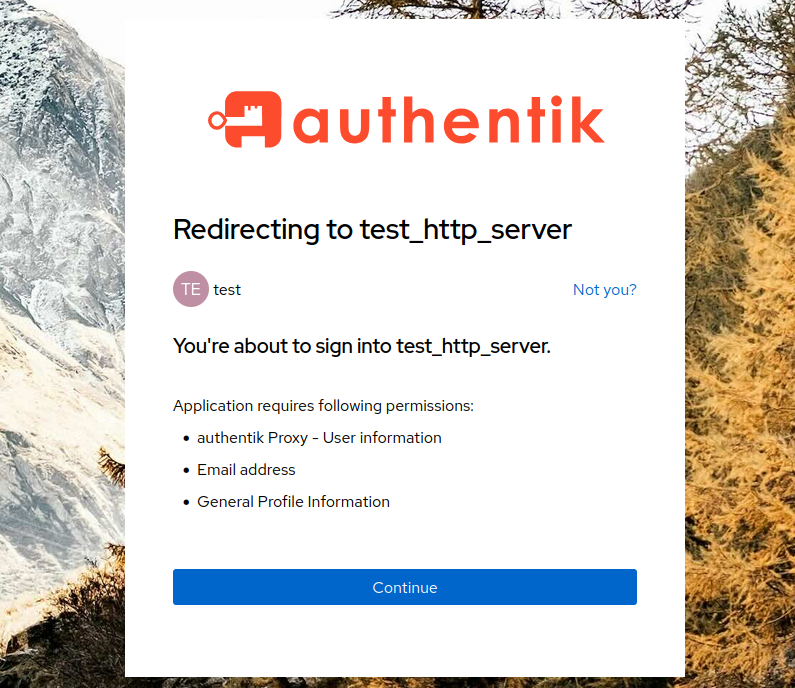
5. Test Authentication to your resource
- In a new incognito tab/window, try to open the https resource
https://resourcename.mydomain.com - If everything is working correctly, you should be redirected to a login page on Authentik
- Log in with the username and password you set from Step 1. where you created a user in Authentik
 Summary
In this guide, we walked through how to secure an HTTP-based application using Pangolin’s middleware manager with Authentik as the external identity provider.
Specifically, we:
- Created a user and configured Authentik for Forward Auth.
- Registered the application (e.g.,
resourcename.mydomain.com) with Authentik. - Enabled forward authentication via the Embedded Outpost.
- Integrated the app with Pangolin and Traefik by enabling middleware and testing the login flow.
This setup allows Pangolin to delegate authentication responsibilities to Authentik, enabling secure, centralized access control for your self-hosted services.
This is a huge new feature on Pangolin and will open up some amazing possibiliites
 Thanks for Reading!
Thanks for following along! This demo is part of a broader approach to self-hosted infrastructure management using Pangolin. While we used a simplified test setup here, the core ideas are production-ready with the right hardening.
If you have any questions or improvements, feel free to share them in the community forum.