Setting Up Pangolin on Proxmox: A Step-by-Step Guide
Pangolin is a powerful self-hosted reverse proxy management server with identity and access management capabilities. This guide will walk you through the process of installing Pangolin on a Proxmox VE container using our automated installation script.
Prerequisites
Before you begin, make sure you have:
- A Proxmox VE server running (version 6.x or later)
- Administrative access to your Proxmox host
- A domain name that points to your Proxmox server’s IP address
- Ports 80 and 443 forwarded to your Proxmox server (from your router/firewall)
- Basic familiarity with Linux command line
Creating a Container for Pangolin
First, you’ll need a container where Pangolin will run:
- Log in to your Proxmox web interface
- Create a new LXC container with these minimum specifications:
- OS: Debian 11 or Ubuntu 20.04+
- CPU: 1 core (2+ recommended)
- RAM: 1GB minimum (2GB+ recommended)
- Storage: 8GB minimum
- Network: DHCP or static IP configuration
- Start the container and note its CTID (Container ID) - you’ll need this later
Downloading and Running the Installation Script
- SSH into your Proxmox host server (not the container)
- Download the installation script:
wget -O install-pangolin.sh https://gist.githubusercontent.com/hhftechnology/875fbf4fcfb1fcdeeb7fd1c086475b94/raw/a4363302d29356835e752f1eda172e32a29e45af/install-pangolin.sh - Make the script executable:
chmod +x install-pangolin.sh - Run the script as root:
sudo ./install-pangolin.sh
Providing the Required Information
The script will prompt you for several pieces of information:
-
Container ID (CTID): Enter the ID number of the container you created earlier.
-
Domain Name: Enter your fully qualified domain name (e.g.,
proxy.example.com). This domain must be pointed to your Proxmox server’s IP address. -
Admin Email: Enter the email address you want to use for the Pangolin administrator account.
-
Admin Password: Create a strong password for the administrator account. The password must have:
- At least 8 characters
- At least one uppercase letter
- At least one lowercase letter
- At least one number
- At least one special character
-
Let’s Encrypt Email: Enter the email address for Let’s Encrypt certificate notifications. You can press Enter to use the same email as the admin account.
Installation Process
Once you’ve provided all the required information, the script will:
- Modify the container configuration to enable necessary features
- Install Docker and Docker Compose in the container if they’re not already installed
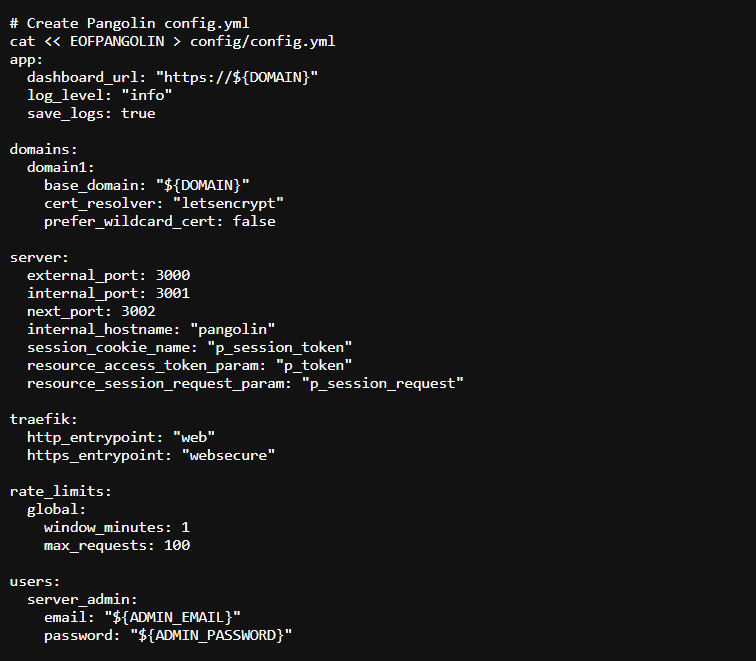
- Create the Pangolin configuration files with your customized settings
- Start the Pangolin and Traefik containers
- Verify the installation was successful
This process typically takes 2-5 minutes, depending on your server’s performance and internet connection speed.
Post-Installation Steps
After the script completes successfully, you’ll see a message with post-installation instructions. Here’s what you need to do next:
-
DNS Configuration:
- Make sure your domain (the one you entered during installation) is pointed to your Proxmox host’s IP address
- Wait for DNS propagation to complete (can take a few minutes to several hours)
-
Port Forwarding:
- Ensure ports 80 and 443 are forwarded from your router to your Proxmox host
- If needed, also set up any internal firewall rules to allow traffic to reach the container
-
Initial Login:
- Once DNS propagation is complete, open a web browser and navigate to
https://your-domain.com - Log in with the admin email and password you provided during installation
- Once DNS propagation is complete, open a web browser and navigate to
-
Creating Your First Organization:
- After logging in, follow the on-screen prompts to create your first organization
- Choose a descriptive name and a unique ID for your organization
-
Setting Up Your First Site:
- Navigate to the Sites tab and click “Add Site”
- Give your site a name (e.g., “Home Network” or “Media Server”)
- Choose “Local” as the connection method
- Complete the site creation process
-
Creating Your First Resource:
- Go to the Resources tab and click “Add Resource”
- Provide a name for the resource (e.g., “Media Server” or “Home Assistant”)
- Choose a subdomain to access this resource
- Select the site you created in the previous step
- Under the Connectivity tab, add your target (internal IP and port of the service)
- Configure authentication as needed
- Save your changes
Troubleshooting Common Issues
If you encounter any issues during or after installation:
-
Certificate Issues: If Let’s Encrypt certificates aren’t being issued, make sure:
- Your domain correctly points to your server’s IP
- Ports 80 and 443 are properly forwarded
- Your Let’s Encrypt email address is valid
-
Connection Refused: If you can’t connect to Pangolin after installation:
- Check that the containers are running with
pct enter <CTID>followed bydocker ps - Verify that your firewall/router is properly forwarding traffic
- Check the container logs with
docker logs pangolinordocker logs traefik
- Check that the containers are running with
-
Login Issues: If you can’t log in to the admin dashboard:
- Double-check you’re using the correct email and password
- If you’ve forgotten your password, you can reset it by modifying the config.yml file and restarting the container
Using Pangolin for Reverse Proxying
Now that Pangolin is installed, you can:
- Add More Resources: Each resource corresponds to a service you want to access through the reverse proxy
- Configure Authentication: Choose from various authentication methods for each resource
- Manage Access: Create more users and assign them appropriate roles
- Monitor Traffic: Use the dashboard to monitor the status of your resources
Conclusion
Congratulations! You now have a fully functional Pangolin installation running on your Proxmox server. This setup allows you to securely access your self-hosted services through a centralized, authenticated reverse proxy.
The installation script has streamlined the setup process, configuring both Pangolin and Traefik with secure defaults. As you become more familiar with Pangolin, you can customize it further to meet your specific needs.
Remember to keep both your Proxmox host and Pangolin container updated with security patches, and periodically check for updates to Pangolin itself.