The Scenario
Our goal is to make use of GitOps (a variation of DevOps, using GitHub) to have a infrastructure-as-code set up, allowing us to easily manage and deploy changes with minimal touch and 1 source of truth.
Whilst Portainer is a GUI based application; it can read code from GitHub which allows it to automatically push changes based on our code.
The lifecycle of the container (starting, stopping and deleting) is still managed via the Portainer GUI.
Prerequisites
- A server
- A GitHub account
Recommended
- Multiple Servers
- Ubuntu Server for the OS

Set up your Repo
Create a Private Repo
If you have a pre-existing repo you wish to use, skip the creation part.
Follow GitHubs documentation on creating a repo
Ensure Repo is Private
Ensure your repo is set to private, or switch it to private
Somethings to think about
Private vs Public repo
I would recommend creating a Private repo so you can store private information, such as API keys in it.
If you’re going to obfuscate your files with variables or secrets (which you will need to store elsewhere), you could make the repo Public. But in my opinion, its better to be safe than sorry.
Please note that the version history is also public, so if you accidentally save a password or API key its saved forever.
What to name your repo
Your repo should be named something you remember and unique to you. It doesn’t really matter though. I would suggest something short so your repo url is short
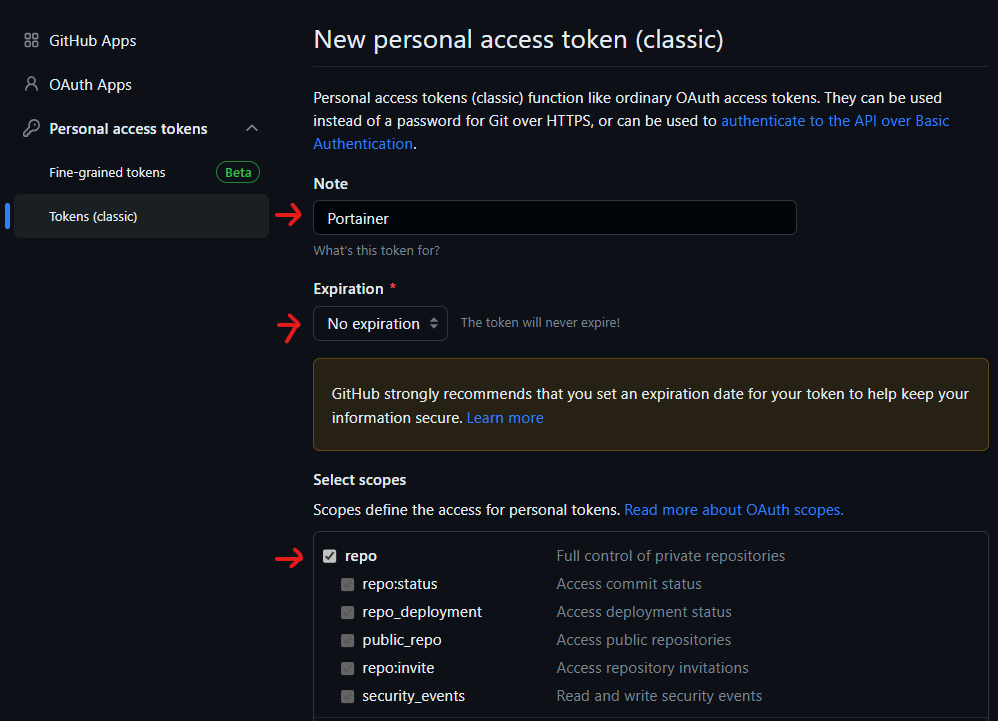
Create a Private Access Token for Portainer
As your repo is private, you will need to create a PAC for Portainer to use and access the repo
-
Click on your profile in the top right, then select Settings
-
On the left, click on Developer Settings
-
Click on Personal Access Tokens, then ‘Tokens (classic)’
-
Click on ‘Generate new token’, then select ‘Classic’
-
Input the below information\
You can expire the credential if you want, though this may break Portainer
-
Scroll down and click on ‘Generate Token’
-
Save your PAC somewhere safe and smart
Install Renovate Bot
The Renovate Bot watches for dependancies and automatically creates merge requests to update the contents of your Repo. This allows you to update your containers outside of Portainer as well as review changes made etc.
Get your Repo ready
-
Create a folder ‘.github’ in the root of your repo
-
Create a folder ‘docker-compose’ in the root of your repo
-
In the ‘.github’ folder, create a file ‘renovate.json5’ with the below contents
{
    "$schema": "https://docs.renovatebot.com/renovate-schema.json",
    "extends": [
        "config:base",
        ":disableRateLimiting"
    ],
    "docker-compose": {
        "fileMatch": ["docker-compose/.+\\.ya?ml$"]
    }
}
This code block tells the bot to watch any ‘.yml’ or ‘.yaml’ file in the ‘docker-compose’ folder
Install the Bot
- You can set renovate to run on all repo’s you own, or only your repo created in this doco This is up to you. If you actually use GitHub for development, it may be best to select only this repo
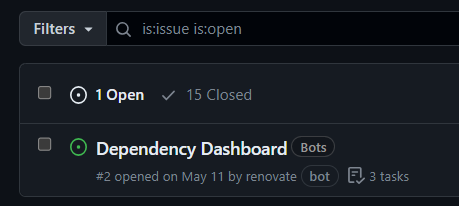
Confirm the bot is installed
-
Browse to your GitHub repo
-
Click on ‘Issues’, you should see the Dependency Dashboard
Configuration suggestion
I would suggest configuring a main Portainer with Edge agents and putting no or minimal containers on the main Portainer instance.
This config requires minimum;
-
One Portainer instance (VM or Bare Metal)
-
One Portainer Edge Agent (VM or Bare Metal)
The advantages of a set up like this are;
-
Portainer Edge can browse Docker Volumes. The main Portainer installation cannot browse volumes, thus you cannot download, edit and upload config files from the browser
-
Reduced security risk if the public facing instance is breaked
-
Segregation
-
A VM for test
-
a VM for prod external services (eg Minecraft server, website)
-
a VM for prod internal only services (eg DNS, PXE)
-
Install Portainer
Configuration suggestion
I would suggest configuring a main Portainer with Edge agents and putting no or minimal containers on the main Portainer instance.
This config requires minimum;
- One Portainer instance (VM or Bare Metal)
- One Portainer Edge Agent (VM or Bare Metal)
The advantages of a set up like this are;
- Portainer Edge can browse Docker Volumes. The main Portainer installation cannot browse volumes, thus you cannot download, edit and upload config files from the browser
- Reduced security risk if the public facing instance is breaked
- Segregation
- A VM for test
- a VM for prod external services (eg Minecraft server, website)
- a VM for prod internal only services (eg DNS, PXE)
Install Portainer
-
SSH into your Docker host and run the below command to login as root.
sudo -iProvide your password when prompted
-
Copy paste the below commands to install Docker (assumes Ubuntu)
{% code lineNumbers=“true” %}
 sudo apt-get update
 sudo apt-get install ca-certificates curl gnupg
 sudo install -m 0755 -d /etc/apt/keyrings
 curl -fsSL https://download.docker.com/linux/ubuntu/gpg | sudo gpg --dearmor -o /etc/apt/keyrings/docker.gpg
 sudo chmod a+r /etc/apt/keyrings/docker.gpg
echo \
  "deb [arch="$(dpkg --print-architecture)" signed-by=/etc/apt/keyrings/docker.gpg] https://download.docker.com/linux/ubuntu \
  "$(. /etc/os-release && echo "$VERSION_CODENAME")" stable" | \
  sudo tee /etc/apt/sources.list.d/docker.list > /dev/null
sudo apt-get update
sudo apt-get install docker-ce docker-ce-cli containerd.io docker-buildx-plugin
{% endcode %}
-
Run the below command to install Portainer
docker run -d --label=com.centurylinklabs.watchtower.enable=true -p 8000:8000 -p 9443:9443 --name=portainer --restart=always -v /var/run/docker.sock:/var/run/docker.sock -v portainer:/data portainer/portainer-ce:latestI would suggest installing Portainer using this command (rather than the one provided by Portainer themselves) as it adds a WatchTower label to enable auto-updates, which we will set up later in this doco\
-
Run the below command and confirm you see that the Portainer container is running
docker up
Configure Portainer
Now that Portainer is installed, we can behind configuring it
Account Creation
- Browse to https://YOURSERVERIP:9443
- Create your credentials, I would suggest following this guide
(Optional) Install Portainer Edge Agents
- On the left hand pane, click on Environments
- On the far right, click on ‘Add environment’
- Select ‘Docker Standalone’ and click on ‘Start Wizard’
-
Click on ‘Edge Agent Standard’
-
Give the instance a name, such as the host name for the server / machine
-
The Portainer API server URL should be something like:
yourserverIP:9443
If possible, use your servers DNS alias here to make your network more resilient to IP address changes -
Click on Create
-
Scroll down and locate the ‘Docker Standalone’ install script and copy this to notepad
-
Ensure the last line is ‘
portainer/agent:latest’ and not versioned (eg agent:10.1) -
Replace the the ‘docker run’ line with the below. This will allow WatchTower to automatically update the Edge Agent
docker run -d --label=com.centurylinklabs.watchtower.enable=true \
-
-
SSH into your server that will have the Edge Agent installed and log in as the Root account with the below command
sudo -i -
Copy paste the below commands to install Docker (assumes Ubuntu)
sudo apt-get update sudo apt-get install ca-certificates curl gnupg sudo install -m 0755 -d /etc/apt/keyrings curl -fsSL https://download.docker.com/linux/ubuntu/gpg | sudo gpg --dearmor -o /etc/apt/keyrings/docker.gpg sudo chmod a+r /etc/apt/keyrings/docker.gpg echo \ "deb [arch="$(dpkg --print-architecture)" signed-by=/etc/apt/keyrings/docker.gpg] https://download.docker.com/linux/ubuntu \ "$(. /etc/os-release && echo "$VERSION_CODENAME")" stable" | \ sudo tee /etc/apt/sources.list.d/docker.list > /dev/null sudo apt-get update sudo apt-get install docker-ce docker-ce-cli containerd.io docker-buildx-plugin -
Install the Edge Agent by copy pasting the text copied and altered in step 5
-
Wait for the container to download and launch
-
Click on ‘Home’ and confirm all your agent’s show a green Heartbeat
-
- Repeat step 3 for any other Edge Agent’s you’re configuring
Create Tags & Groups
- On the left hand panel, click on Environments
- Click on Tags
- Create any relevant tags, such as ‘Test’ or ‘Production’
- On the left, click on Groups
- Click on Add Group
- Provide a name, eg ‘Test’ or ‘Production’
- Provide a description, eg ‘Test servers’
- Click on tags and select the relevant tag
- Click on ‘Create group’
- Repeat step 5 for any other groups
Apply Tags
- On the left hand menu, click on Home
- Click on the pen icon next to your first Portainer instance
- under Metadata
- Under Group, select the relevant group (eg ‘test’)
- Under Tags, select the relevant tag/s (eg ‘test’, ‘linux’)
- Click on Update environment
- Repeat for each Portainer instance
Enable Edge Compute
- On the left hand panel, click on Settings
- Click on ‘Edge Compute’
- tick ‘Enable Edge Compute features’
Set up the WatchTower Edge stack
- On the left, click on ‘Edge Stacks’ and click on ‘Create’
- Name your stage ‘WatchTower’
- Click on Edge Groups and select all your groups
- In the web editor, provide the below compose file and hit deploy
version: '3'
services:
  app:
    image: ghcr.io/containrrr/watchtower:latest
    restart: always
    volumes:
      - /var/run/docker.sock:/var/run/docker.sock
    environment:
      - TZ=$TZ
      - WATCHTOWER_ROLLING_RESTART=true
      - WATCHTOWER_CLEANUP=true
      #- WATCHTOWER_DEBUG=true
      - WATCHTOWER_INCLUDE_STOPPED=true
      - WATCHTOWER_POLL_INTERVAL=86400
      - WATCHTOWER_RUN_ONCE=true
      - WATCHTOWER_LABEL_ENABLE=true
    #command: --label-enable
    logging:
      driver: "json-file"
      options:
        max-size: "10m"
        max-file: "3"
-
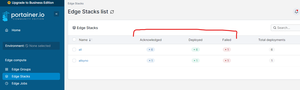
Take note of the state of your stacks
-
Click on ‘WatchTower’ and you will be shown the same screen as step 1. You can make any adjustments to the stack here, such as removing groups or editing the compose file
-
Click on the Environments tab. This will show any server the stack has been deployed too and their state. The stack will be deloyed to any devices in the groups chosen in step 1.2
This stack will enable auto-updates for anything with the com.centurylinklabs.watchtower.enable=true label
Please note: This is NOT a recommended solution for updating containers. This guide will only assist you with updating Portainer, as it is potentially a public facing resource and needs to be patched. The WatchTower auto update may (and probably will) break Portainer at some stage. Keep backups.
Create your first GipOps Compose file
Create your first Compose file
In this example, we’re going to massage the LinuxServer.io’s Ombi image to match our best practices, per below
Create your Compose file
-
Open your GitHub repo and enter the docker-compose folder
-
Click on ‘Add file’ > ‘Create new file’
-
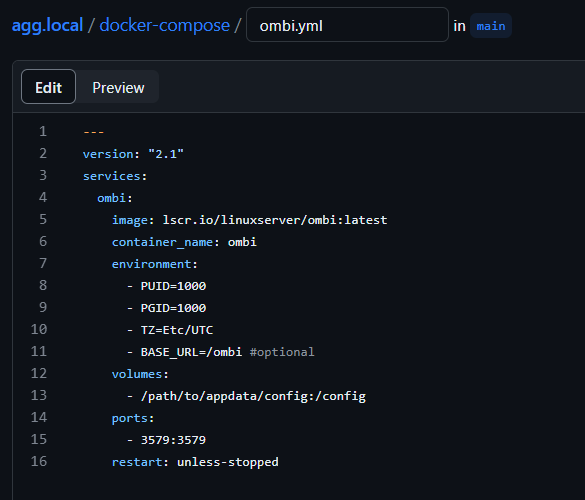
Name the file ‘ombi.yml’, and copy the compose file from here
It should look something like this:
-
Refer to the best practices and tips documentation below and edit the file
-
Hit ‘Commit changes…’
-
hit ‘Commit changes’
Oh, you want me to give you the answer to step 4?
As of writing, here is the ombi.yml compose file
---
version: "2.1"
services:
  ombi:
    image: lscr.io/linuxserver/ombi:latest
    container_name: ombi
    environment:
      - PUID=1000
      - PGID=1000
      - TZ=Etc/UTC
      - BASE_URL=/ombi #optional
    volumes:
      - /path/to/appdata/config:/config
    ports:
      - 3579:3579
    restart: unless-stopped
Here is my tweaked file
---
version: "2.1"
services:
  ombi:
    image: ghcr.io/linuxserver/ombi:4.39.1
    #container_name: ombi
    environment:
      - PUID=1000
      - PGID=1000
      - TZ=$TZ
      - BASE_URL=/$BASE_URL #optional
    volumes:
      - config:/config
    ports:
      - $PORT_HTTP:3579
    restart: unless-stopped
volumes:
  config:
Best Practices and tips
Variables
To keep your compose files as system agnostic as possible, its best to use variables where you can. Some suggestions are
- Ports (eg $HTTP_PORT, $DB_PORT, $API_PORT)
- Mounted volumes (eg $CONFIG, $DATA)
- Timezones (eg $TZ)
These variables can then be set in Portainer when creating the stack
Don’t name containers unless there is a requirement for it
Some compose files may name a database ‘db’, which will then block you from using that name anywhere else. Its best to let Portainer manage names of containers.
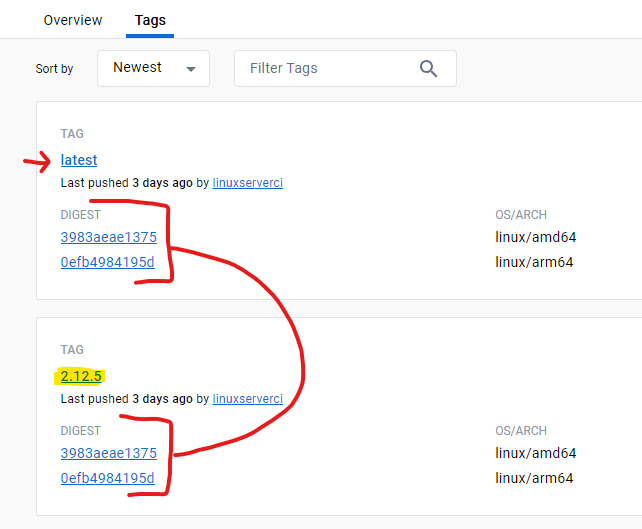
Container Image versioning
Do not use the ‘latest’ tag, as it does not allow Renovate to update the compose file
When versioning your compose files, locate the ‘latest’ tag on the DockerHub, GitHub etc and use the relevant version number.
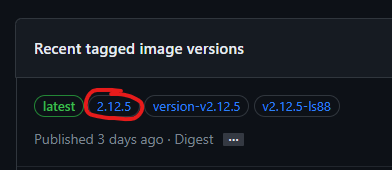
This is harder to do on DockerHub. Per the screenshot below, we’ve located the ‘tatest’ tag and used the Digest to locate the correct version.
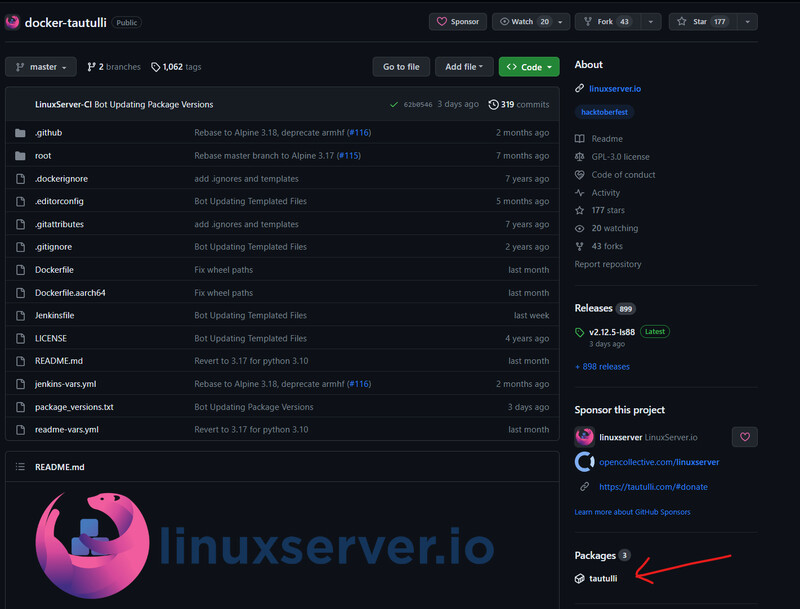
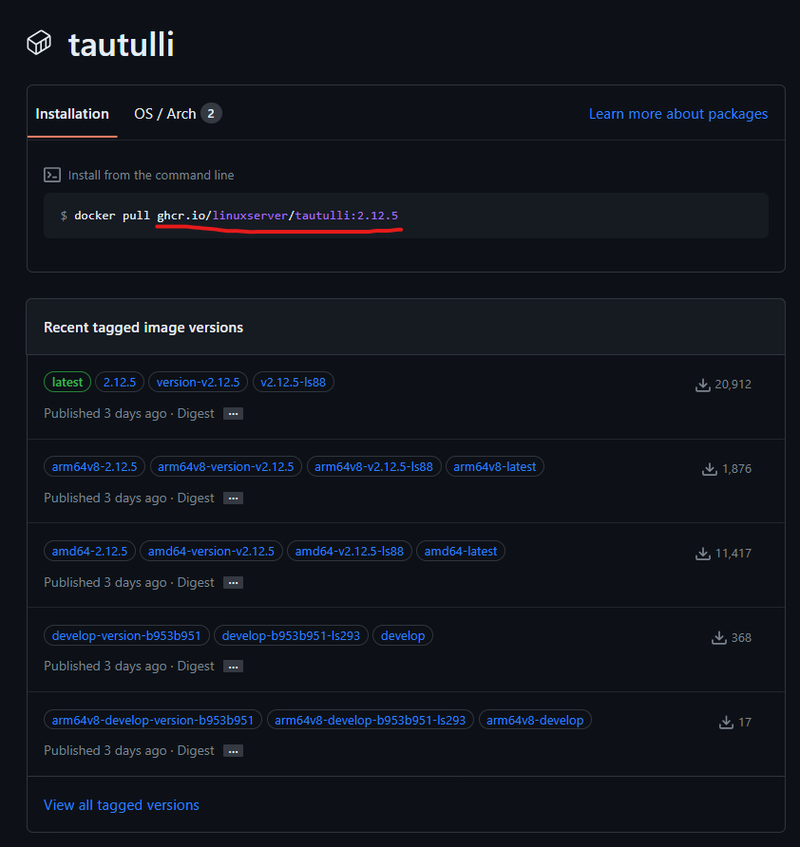
Container Image locations
As Docker has now started rate limiting non-paying users, a lot of container creators are putting their containers on GitHub or other services
Its quite easy to figure out if a container exists on GitHub;
-
If the ‘Packages’ option exists, the container is on GitHub\
-
The container URL is underlined\
Deploy your first GitOps stack
What is a Stack?
Stacks is how Portainer handles Docker Compose files, which are infrastructure as code documents for spinning up multiple containers, volumes and networks in 1 go.
Most docker container developers now provide example compose files with their projects. Its also possible to Google and find examples online
For example, you may have a service that has a separate container for
- a database
- a web app
- back end compute
The database and back end compute may be on Network 1, while the web app is on Network 2.
All 3 containers have access to the same ‘config’ volume, but the database and webapp have their own unique volumes
The database and backend need the same credentials to the 2 systems can talk, but the web app has separate credentials for the gui. These are environmental variables
Instead of manually setting up and inputting environmental variables, networks and volumes for each container this can all be written into the compose and and span up in 1 click. This also makes the set up system agnostic.
Deploy your Stack
In this practice, we’re going to deploy the Ombi compose file we created in create-your-first-gipops-compose-file.md
-
Log into Portainer
- If you set up Edge Agents, click on the host you want Ombi to exist on
-
On the left hand menu, select ‘Stacks’
-
Click on ‘Add stack’
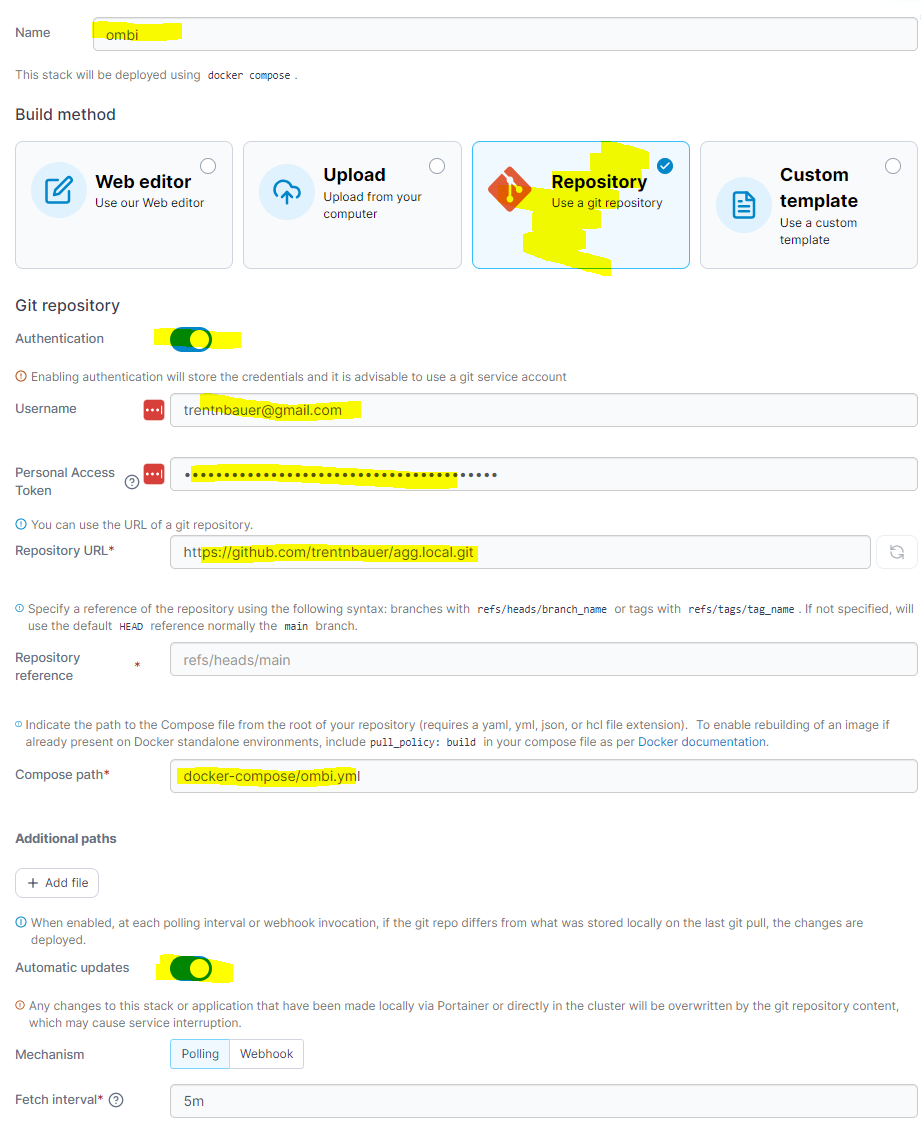
- Give your stack a name (eg “ombi”)
- Build method = Repository
- Tick ‘Authentication’
- Username = Github Email
- Personal Access Token
- Repository URL = the URL of your repo + .git (eg “https://github.com/trentnbauer/agg.local.git\_”_)
- Compose path = docker-compose/ombi.yml
- Tick ‘Automatic updates’
You should see a page similar to this,\
Pro tip - you can use the Fetch interval to delay updates on some services. An example I have of this is my redundant Cloudflare Tunnel containers. One server updates every 15 minutes, the other updates every 24hours. They both use the same compose file. This means if an update breaks the 15m instance, then 24h is still live for me to roll back
-
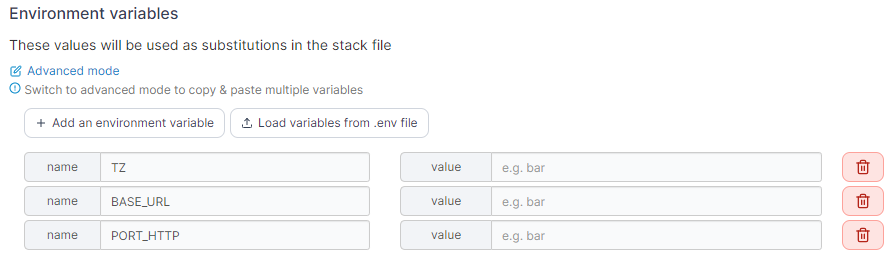
Scroll down to the ‘environment variables’ section and add the following variables
- TZ
- BASE_URL
- PORT_HTTP
-
Provide your TZ per the ‘tz identifier’ here
-
Provide a base url, if you are using one (not required)
-
Provide the port that Ombi will use
-
Click on ‘Deploy the stack’
If you have any issues, refer to the Notifications tab at the top of the page;

Managing your production compose files
Updating Containers
Updates are managed via the renovate bot and automatically pulled by Portainer
Updating the Compose file
When a new update is released, the renovate bot will create a pull request in your repo;
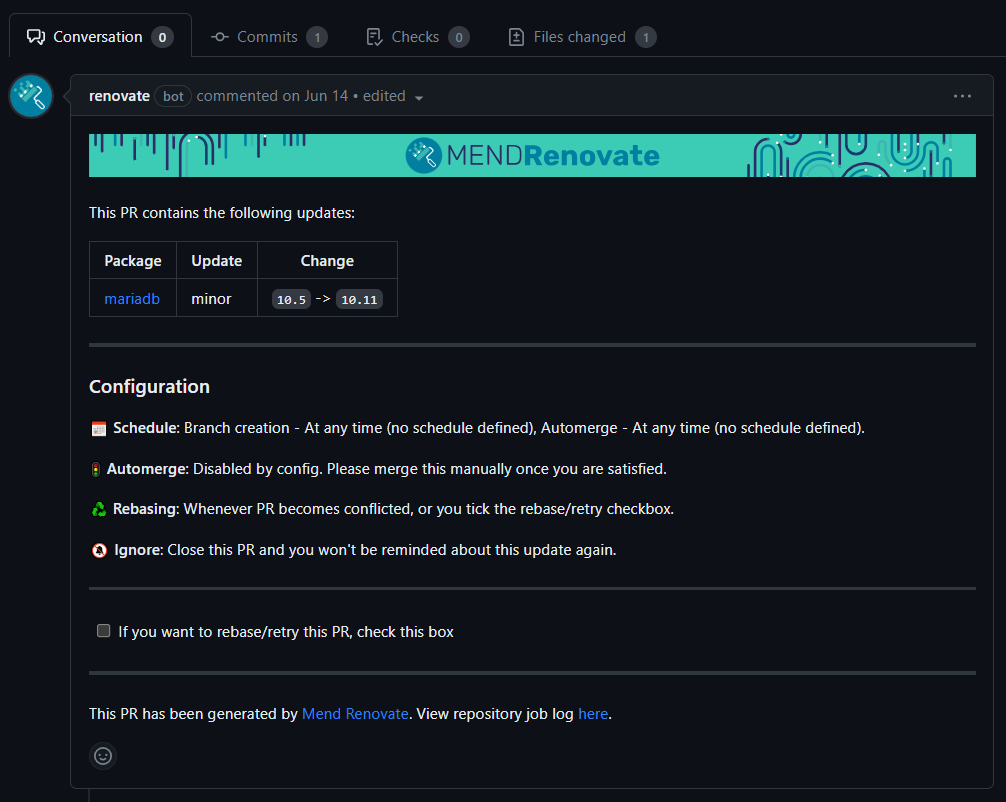
We can see that this pull request is updating the ‘package’, ‘mariadb’. It is a minor update, going from version 10.5 to 10.11
Clicking on the ‘Files changed’ tab will list any files that will be updated;
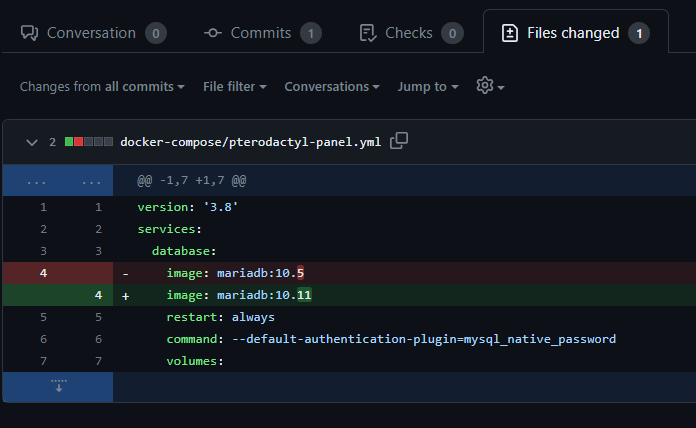
If we are happy with this update, we can click on the ‘Merge pull request’ button at the bottom of the homepage
Updating Portainer
Portainer will check in with GitHub and download the updated compose file and update the container image.
You can tell Portainer to manually pull by;
- Browse to the stack
- Click on ‘Pull and redeploy’
Changing Compose Files
Compose files can be changed in your GitHub repo. These will sync automatically to Portainer