Implementing External Authentication in Pangolin Using OIDC (Google OAuth)

:shield: Implementing External Authentication in Pangolin Using OIDC (Google OAuth)

Pangolin now supports external identity providers using OAuth2/OIDC. This powerful feature allows Pangolin to act as a full authentication proxy and replace both Pangolin’s own login system and protect downstream services that don’t natively support SSO. In this guide, we’ll demonstrate how to use Google OAuth as your identity provider but the process should be the same for most Idps.

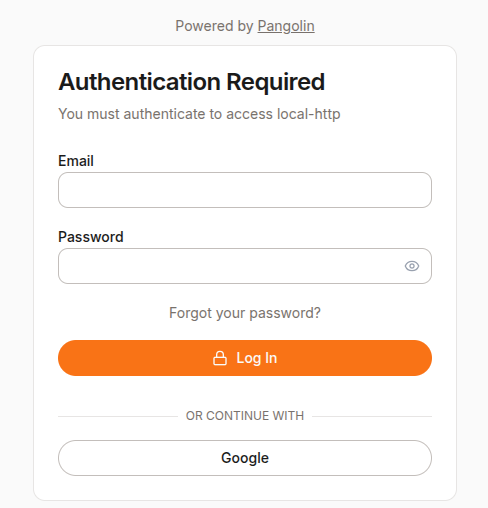
The diagram above show a screenshot of the Pangolin login page with a Google login option.


:clipboard: Prerequisites

  • A working Pangolin setup
  • A domain name with DNS pointing to your Pangolin server (e.g. pangolin.yourdomain.com)
  • A Google account with access to the Google Cloud Console

:rocket: Step 1: Upgrade Pangolin

Ensure you’re using at least v1.3.0 or the latest, which supports external identity providers.

Update your Docker Compose to have the latest version of Pangolin.

services:
  pangolin:
    image: fosrl/pangolin:1.3.0
    container_name: pangolin
    restart: unless-stopped
    volumes:
      - ./config:/app/config
    healthcheck:
      test: ["CMD", "curl", "-f", "http://localhost:3001/api/v1/"]
      interval: "3s"
      timeout: "3s"
      retries: 5

Restart your containers:

docker compose down
docker compose up -d

:key: Step 2: Set Up Google OAuth

  1. Go to the Google Cloud Console
  2. Navigate to APIs & Services > Credentials
  3. Click Create Credentials → OAuth client ID
  4. Choose Web Application
  5. Add an Authorized redirect URI — you’ll get this later from Pangolin, but it will look like:
https://pangolin.yourdomain.com/auth/idp/1/oidc/callback

:repeat_button: You may need to return to update this URI after completing Pangolin setup in Step 3

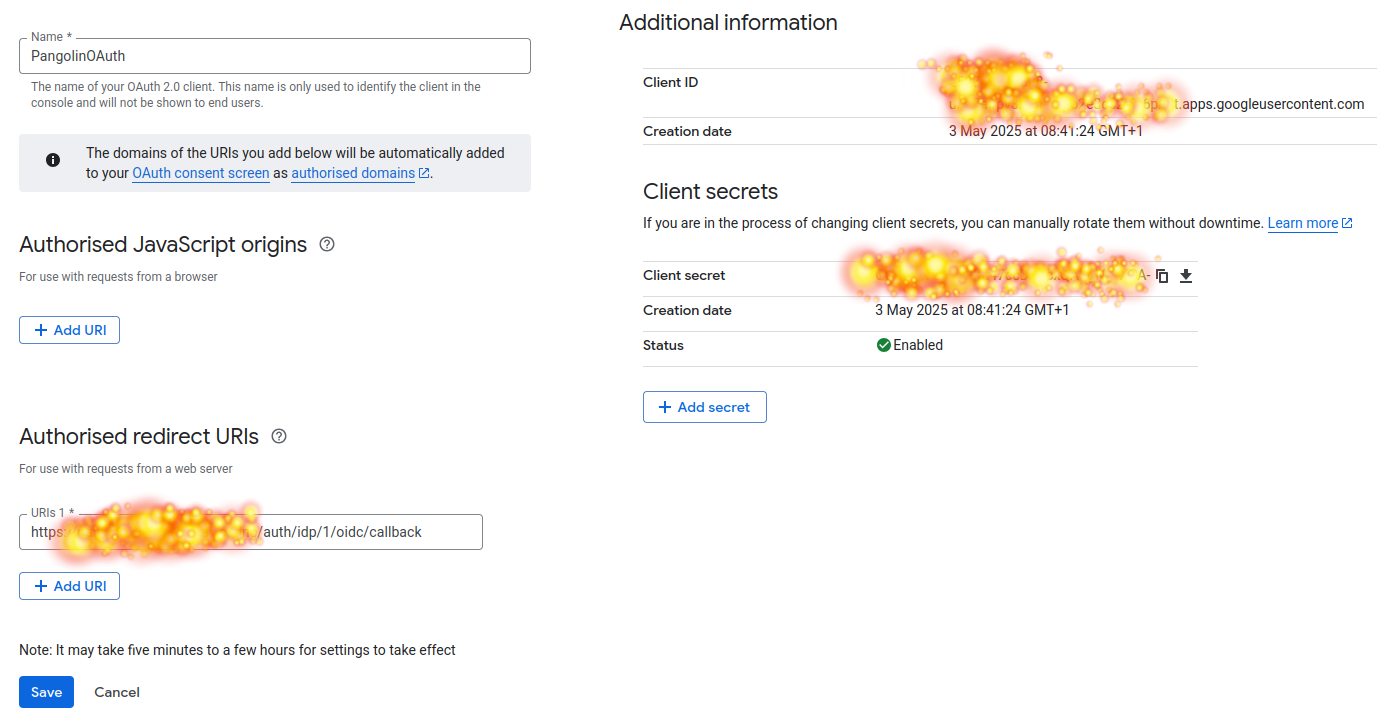
The diagram above shows the Google Console with the redirect URI input box.

Copy your Client ID and Client Secret.


:brain: Step 3: Create a New Identity Provider in Pangolin

  1. In Pangolin, go to Server Admin → Identity Providers
  2. Click Create Identity Provider

Fill in the fields:

  • Name: Google
  • Client ID / Client Secret: Use values from the Google Console

OAuth URLs:

  • Authorization URL:
    https://accounts.google.com/o/oauth2/v2/auth
    
  • Token URL:
    https://oauth2.googleapis.com/token
    

Token Configuration:

  • Set Identifier Path to email

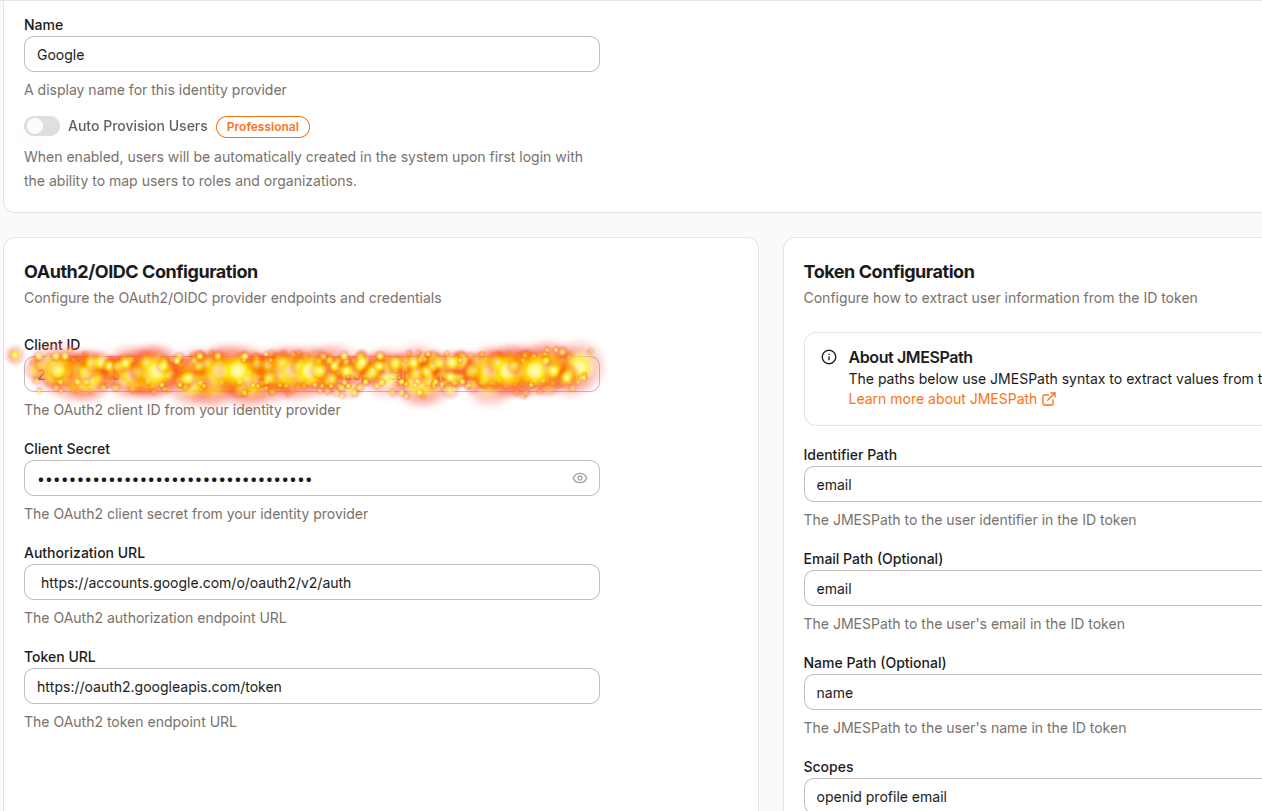
The diagram above shows the filled-out Identity Provider form in Pangolin.

Click Create Identity Provider.

Copy the Redirect URL provided (e.g., https://pangolin.yourdomain.com/auth/idp/1/oidc/callback) and return to Google Cloud Console to paste it in the Authorized redirect URIs.


:bust_in_silhouette: Step 4: Add a Google User in Pangolin

  1. Go to Organization → Users
  2. Click Create User
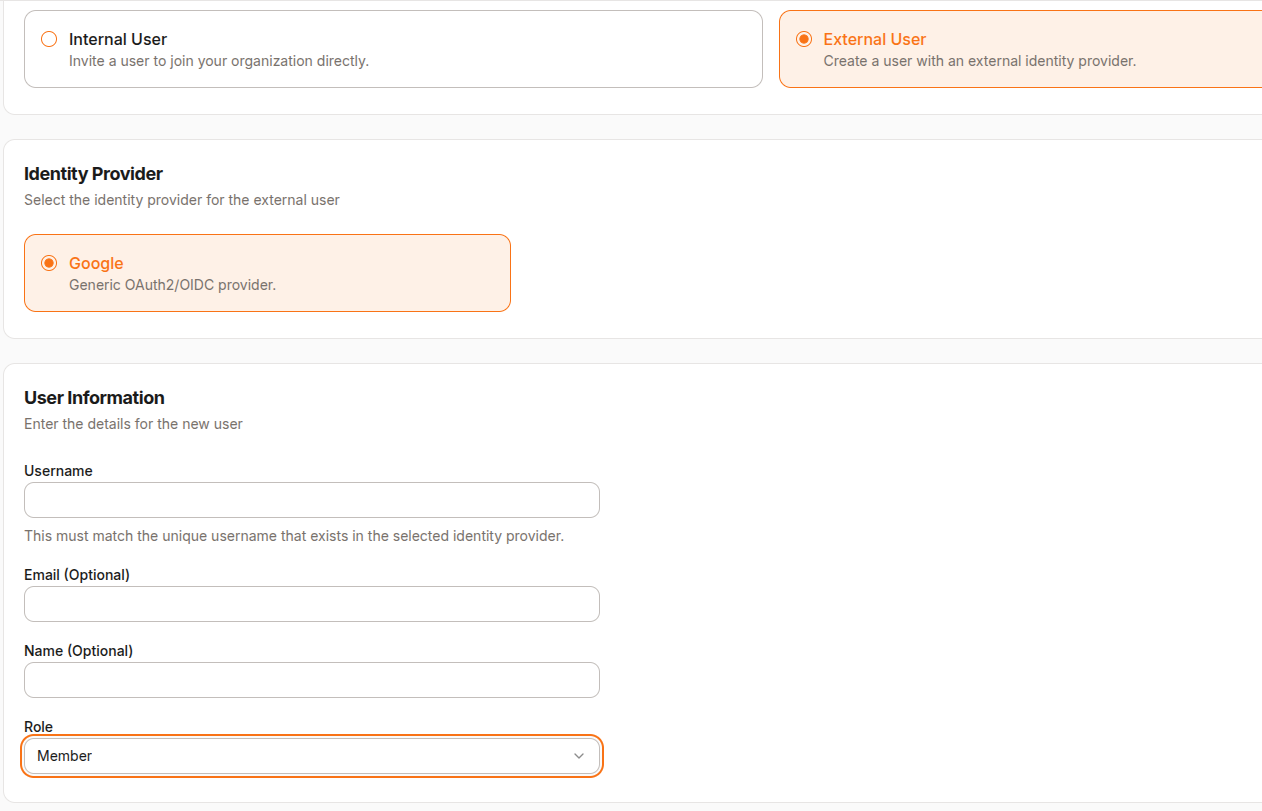
  3. Choose External User
  4. Select Google as the Identity Provider
  5. Set the username as the email address of the Google account you’ll use to sign in


:gear: Step 5: Test with a Sample Web App

You don’t need this step if you already have a resource that you’d like to protect.

5.1 Start a Simple HTTP Server

Add this to your docker-compose.yml for a temporary test server:

  python-http:
    image: python:3.11-slim
    container_name: python-http
    working_dir: /app
    command: python -m http.server 15000
    ports:
      - "15000:15000"
    restart: unless-stopped

Start it:

docker compose up -d

5.2 Create a Resource in Pangolin

  1. Go to Resources in Pangolin
  2. Create a new resource:
    • Name: local-http
    • URL: https://local-http.yourdomain.com
    • IP / Hostname: python-http
    • Port: 15000
  3. Assign a Role (e.g., member)

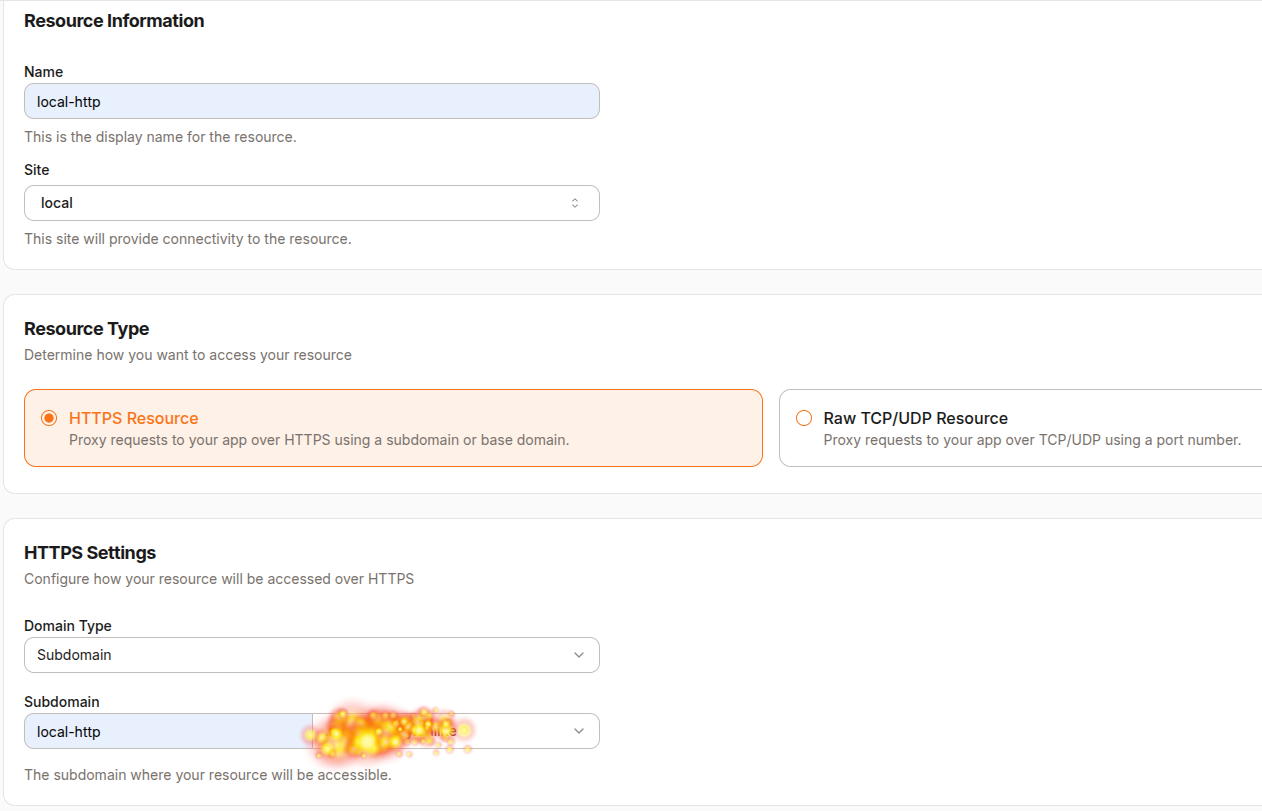
The diagram above shows the new resource form with values filled out.


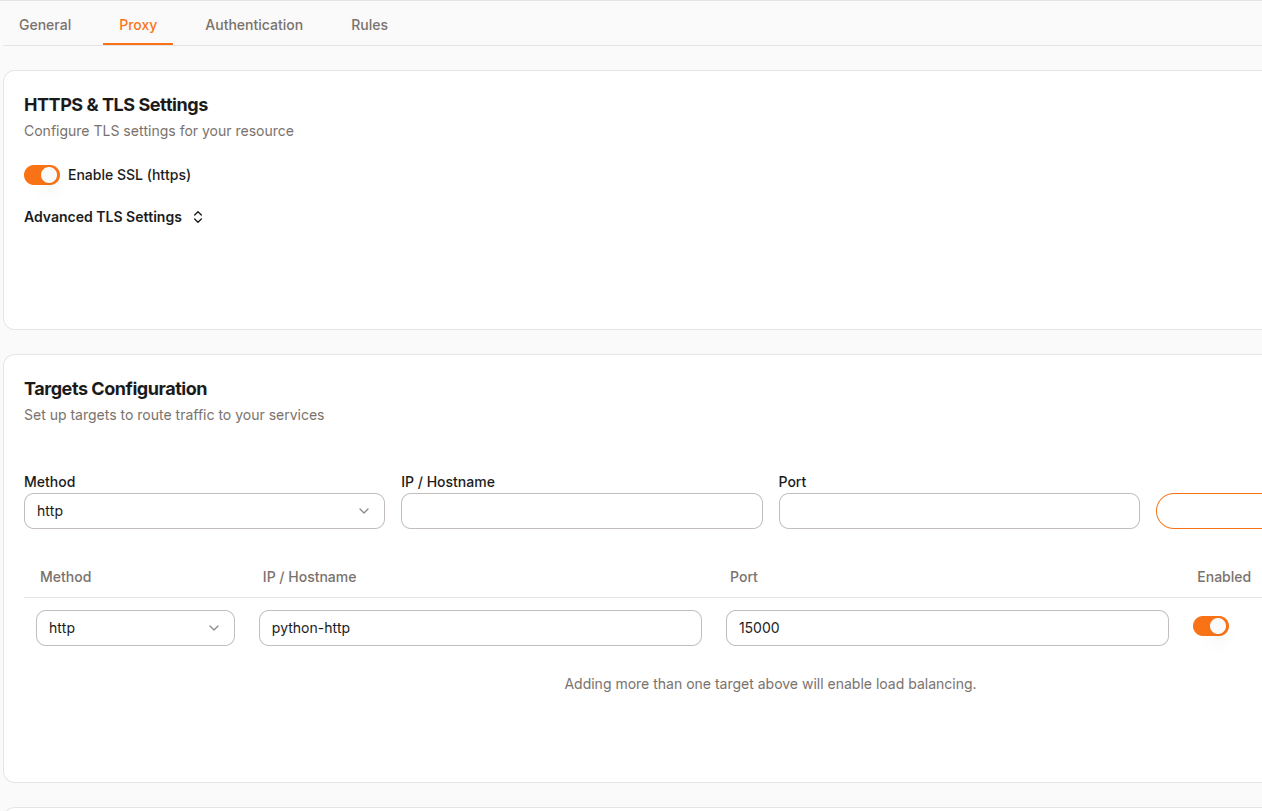
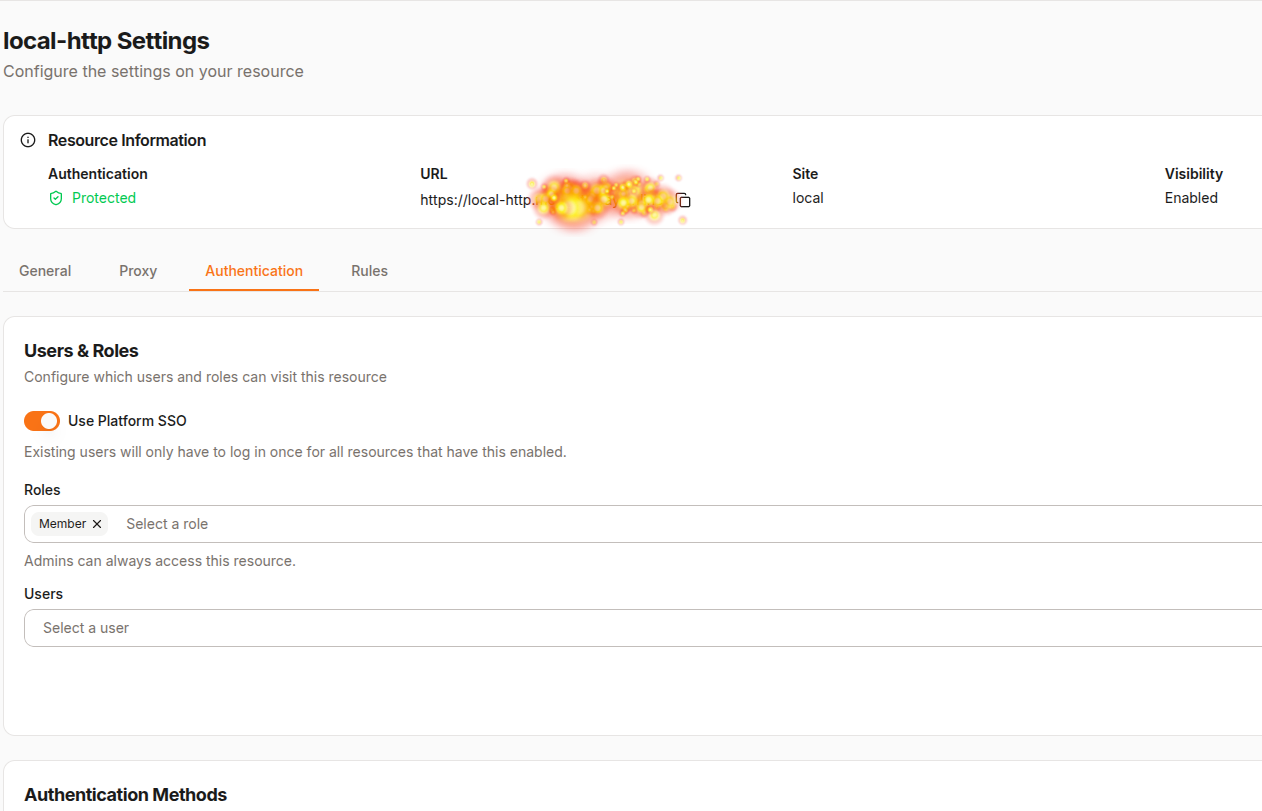
The diagrams above show the proxy settings and authentication settings


:test_tube: Step 6: Try Logging In

  1. Open an Incognito Window (to avoid existing cookies). If you are still logged in you may need to clear cookies.
  2. Visit:
    https://local-http.yourdomain.com
    
  3. You should be greeted by a login screen with the Google login button

Above shows the Pangolin login screen with Google option

  1. Click Google
  2. You will be redirected to Google’s login page. Use the account you configured.
  3. On success, you’ll return to the HTTP test page

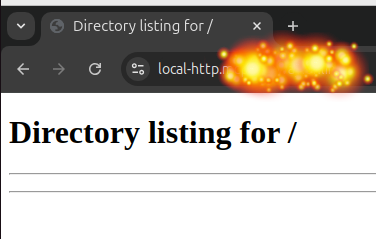
Above shows a successful login flow and arrival at the web page


:hammer_and_wrench: Step 7: Troubleshooting

  • Google error (400):
    • Check that the redirect URI in the Google Console matches Pangolin’s exactly
  • Login works but user is unauthorized:
    • Make sure the user’s username and email in Pangolin matches the Google account email
    • Ensure the correct role is assigned to that user
  • Scope errors:
    • Check the scopes used by Pangolin and that email is correctly parsed via the Identifier Path

:white_check_mark: Summary

In this guide, we showed how to use Google as an external OIDC identity provider to authenticate users in Pangolin. You now have a fully working setup where Google handles identity, and Pangolin handles access control to internal services.


:folded_hands: Thank You

Thanks for following along! Pangolin is evolving quickly, and support for OIDC brings it closer to becoming a truly enterprise-ready secure access gateway. If you found this helpful, feel free to explore other features like middleware-manager and join our discord.

Happy authenticating! :rocket:

6 Likes

Can I use authentik here? I always thought about setting up authentik and this could be my motivation now.

1 Like

Yes - it should work with Authentik but I havent tested it myself. Same process.

2 Likes

Question from pangolin discord that probably relevant to readers here:

Q: Is it necessary to create external users for using oauth? Wondering if an existing internal user can be logged in both via pangolin credentials and google oauth (as long as the email matches)

A:
I just tried that. It didnt work. I created a local user with an email (a google email). I then tried to login to pangolin using the same email using the “Login with Google” option but I got this error

Connecting to Google Validating your identity There was a problem connecting to Google. Please contact your administrator User not provisioned in the system

so guess they need to be set up as “external users” for OIDC to work. Unless I am mistaken?

1 Like

Any chance you can do a guide like this for GitHub, Microsoft, and other common ones that make sense as well?

1 Like

yes - I will put a guide together at some stage. We are focusing on the self-hosted open source tools for the moment but we will get to GitHub, Microsoft etc

1 Like

Here’s the guide for Discord. Still getting tripped up on GitHub. Microsoft requires a paid Azure account now.

  1. In discord developer portal

    1. Create new application here: Discord Developer Portal
    2. Give it a name like yourapp-SSO, then go to OAuth2
    3. Grab both the Client ID and Client Secret
  2. In Pangolin

    1. Go to Pangolin > Server Admin > identitiy providers
    2. Add identity provider,
    3. call it Discord SSO (This is what’s displayed on the front end)
    4. Make sure auto provision users is unticked.
    5. Client ID / Client Secret - Paste in the values from discord
    6. Auth URL keep blank for the moment - we’ll come back to this (see Step 3.3)
    7. Token URL set to https://discord.com/api/oauth2/token
    8. Identifier Path: sub
    9. Scopes: identify openid
    10. Save then scroll to the top, you’ll see “Redirect URL”, it’ll look something like https://yourpangolininstance.com/auth/idp/1/oidc/callback - Copy that.
  3. Back in discord developer portal

    1. Paste that Redirect URL under “Redirects” and then scroll down
    2. Tick identify and openid
    3. Select your redirect url from the dropdown (Should be the same as what you pasted above)
    4. Grab the Generated url and copy it
  4. Back in pangolin again

    1. Set the Authorization URL to what you got from discord.
    2. Save
    3. Leave Organization Policies alone, same with Email Path and Name Path - Discords JWT doesn’t contain any of this info, so you can’t hook it.
  5. Go back to your manage sites in pangolin

    1. Go to Roles > Create role called discord
    2. Go to your discord app > Settings > search for developer mode and enable it
    3. Click on your profile picture bottom left, and copy user id
    4. Go to users > create user
    5. Select External user
    6. Select Discord SSO (Assuming you called it that in 2.3)
    7. Set the username to the user id you copied in 5.3
    8. Email - leave blank, not much point unless you desperately want to add it.
    9. Name - Set to the users name.
    10. Role - Set to Discord
  6. Final steps. Reources.

    1. Go to Resources > Find a resource and click Edit
    2. Go to Authentication
    3. USe Platform SSO
    4. Set Roles to Discord (And whatever else you want)
    5. Save users & roles

Guide written by Discord User: 231323061486485514

2 Likes

Everything works but I am getting unauthorized not sure why I am seeing that number for the username.

User with username 10118977416xxxxxx is unprovisioned. This user must be added to an organization before logging in.

1 Like

I have it working I needed to open server admin all users and I could see the user with that number added that to users and now it works.

2 Likes

One vote for a guide on using Zitadel for an IdP. It’s great for open-source Identity management

1 Like

maybe next week, few things in pipe line

Here’s a repo I put together for spinning up auth servers on AWS. Zitadel was included

Follow the userdata script I used to get zitadel working

          #!/bin/bash -xe

          # Log all output to a file for debugging
          exec > >(tee /var/log/user-data.log) 2>&1

          echo "Starting user data script execution at $(date)"

          # Wait for cloud-init to complete
          timeout 60 cloud-init status --wait || echo "Cloud-init wait timed out after 60 seconds, continuing anyway"

          # Sleep to allow the system to settle
          sleep 30

          echo "Proceeding with Docker installation at $(date)"

          # Update package lists
          apt-get update

          # Install prerequisites
          apt-get install -y ca-certificates curl gnupg

          # Set up Docker repository
          install -m 0755 -d /etc/apt/keyrings
          curl -fsSL https://download.docker.com/linux/ubuntu/gpg -o /etc/apt/keyrings/docker.asc
          chmod a+r /etc/apt/keyrings/docker.asc

          # Add Docker repository
          echo "deb [arch=$(dpkg --print-architecture) signed-by=/etc/apt/keyrings/docker.asc] https://download.docker.com/linux/ubuntu $(. /etc/os-release && echo "$VERSION_CODENAME") stable" | tee /etc/apt/sources.list.d/docker.list > /dev/null

          # Update package lists again with Docker repository
          apt-get update

          # Install Docker
          apt-get install -y docker-ce docker-ce-cli containerd.io docker-buildx-plugin docker-compose-plugin

          # Add the default user to the docker group
          usermod -aG docker ubuntu

          # Enable and start Docker service
          systemctl enable docker.service
          systemctl enable containerd.service
          systemctl start docker.service

          echo "Docker installation completed successfully at $(date)!"

          # Ensure openssl is installed
          if ! command -v openssl &> /dev/null; then
              echo "openssl not found, installing..."
              apt-get install -y openssl
          fi

          # Create directory structure
          mkdir -p /home/ubuntu/config/zitadel
          mkdir -p /home/ubuntu/traefik/letsencrypt
          mkdir -p /home/ubuntu/machinekey
          
          # Generate random passwords
          POSTGRES_PASSWORD=$(openssl rand -base64 32 | tr -dc 'a-zA-Z0-9' | fold -w 32 | head -n 1)
          ZITADEL_MASTERKEY=$(openssl rand -base64 32 | tr -dc 'a-zA-Z0-9' | fold -w 32 | head -n 1)
          
          # Create .env file
          cat > /home/ubuntu/.env << EOF
          POSTGRES_PASSWORD=${POSTGRES_PASSWORD}
          POSTGRES_USER=zitadel
          POSTGRES_DB=zitadel
          ZITADEL_MASTERKEY=${ZITADEL_MASTERKEY}
          ZITADEL_FIRSTINSTANCE_ORG_HUMAN_USERNAME=root@yourdomain.com
          ZITADEL_FIRSTINSTANCE_ORG_HUMAN_PASSWORD=RootPassword1!
          EOF
          
          # Set proper ownership
          chown ubuntu:ubuntu /home/ubuntu/.env
          chmod 600 /home/ubuntu/.env
          
          echo ".env file created successfully at $(date)!"
          
          # Create zitadel.yaml configuration file
          cat > /home/ubuntu/config/zitadel/zitadel.yaml << EOF
          Log:
            Level: 'info'
          
          ExternalSecure: true
          ExternalDomain: 'auth.yourdomain.com'
          ExternalPort: 443
          
          SystemDefaults:
            KeyConfig:
              PrivateKeyLifetime: 8760h
              PublicKeyLifetime: 1080h
          
          Database:
            postgres:
              Host: postgresql
              Port: 5432
              Database: zitadel
              MaxOpenConns: 25
              MaxConnLifetime: 1h
              MaxConnIdleTime: 5m
              Options:
              User:
                Username: zitadel
                Password: ${POSTGRES_PASSWORD}
                SSL:
                  Mode: disable
              Admin:
                Username: zitadel
                Password: ${POSTGRES_PASSWORD}
                SSL:
                  Mode: disable
          EOF
          
          # Create docker-compose.yml file
          cat > /home/ubuntu/docker-compose.yml << 'EOF'
          services:
            traefik:
              image: traefik:v3.4
              container_name: traefik
              restart: unless-stopped
              ports:
                - "80:80"
                - "443:443"
              command:
                - "--log.level=DEBUG"
                - "--api.insecure=false"
                - "--providers.docker=true"
                - "--providers.docker.exposedbydefault=false"
                - "--entrypoints.web.address=:80"
                - "--entrypoints.web.http.redirections.entryPoint.to=websecure"
                - "--entrypoints.web.http.redirections.entryPoint.scheme=https"
                - "--entrypoints.websecure.address=:443"
                - "--certificatesresolvers.myresolver.acme.httpchallenge=true"
                - "--certificatesresolvers.myresolver.acme.httpchallenge.entrypoint=web"
                - "--certificatesresolvers.myresolver.acme.email=admin@yourdomain.com"
                - "--certificatesresolvers.myresolver.acme.storage=/letsencrypt/acme.json"
              volumes:
                - /var/run/docker.sock:/var/run/docker.sock:ro
                - ./traefik/letsencrypt:/letsencrypt
              networks:
                - proxy
          
            postgresql:
              image: postgres:16-alpine
              container_name: postgresql
              restart: unless-stopped
              environment:
                POSTGRES_PASSWORD: ${POSTGRES_PASSWORD}
                POSTGRES_USER: ${POSTGRES_USER}
                POSTGRES_DB: ${POSTGRES_DB}
              volumes:
                - pgdata:/var/lib/postgresql/data
              healthcheck:
                test: ["CMD-SHELL", "pg_isready -U ${POSTGRES_USER}"]
                interval: 5s
                timeout: 5s
                retries: 5
              networks:
                - zitadel
          
            zitadel:
              image: ghcr.io/zitadel/zitadel:latest
              container_name: zitadel
              restart: unless-stopped
              command: >
                start-from-init
                --masterkey "${ZITADEL_MASTERKEY}"
                --tlsMode external
                --config /config/zitadel.yaml
              environment:
                - ZITADEL_FIRSTINSTANCE_ORG_HUMAN_USERNAME=${ZITADEL_FIRSTINSTANCE_ORG_HUMAN_USERNAME}
                - ZITADEL_FIRSTINSTANCE_ORG_HUMAN_PASSWORD=${ZITADEL_FIRSTINSTANCE_ORG_HUMAN_PASSWORD}
              volumes:
                - ./config/zitadel:/config
                - ./machinekey:/machinekey
              depends_on:
                postgresql:
                  condition: service_healthy
              labels:
                - "traefik.enable=true"
                - "traefik.http.routers.zitadel.rule=Host(`auth.yourdomain.com`)"
                - "traefik.http.routers.zitadel.entrypoints=websecure"
                - "traefik.http.routers.zitadel.tls=true"
                - "traefik.http.routers.zitadel.tls.certresolver=myresolver"
                - "traefik.http.services.zitadel.loadbalancer.server.port=8080"
                - "traefik.http.services.zitadel.loadbalancer.server.scheme=h2c"
                - "traefik.http.middlewares.zitadel-https-redirect.redirectscheme.scheme=https"
                - "traefik.http.middlewares.zitadel-https-redirect.redirectscheme.permanent=true"
                - "traefik.http.routers.zitadel-http.rule=Host(`auth.yourdomain.com`)"
                - "traefik.http.routers.zitadel-http.entrypoints=web"
                - "traefik.http.routers.zitadel-http.middlewares=zitadel-https-redirect"
              networks:
                - proxy
                - zitadel
          
          volumes:
            pgdata:
          
          networks:
            proxy:
            zitadel:
          EOF
          
          # Set proper ownership
          chown ubuntu:ubuntu /home/ubuntu/docker-compose.yml
          chown -R ubuntu:ubuntu /home/ubuntu/config
          chown -R ubuntu:ubuntu /home/ubuntu/traefik
          chown -R ubuntu:ubuntu /home/ubuntu/machinekey
          
          echo "ZITADEL configuration completed successfully at $(date)!"