How to Stream to Twitch from geographical distance places from Twitch’s primary servers Using TCP Optimizer and TwitchTest
Streaming to Twitch from your home can be a rewarding experience, but if due to the geographical distance from Twitch’s primary servers, streamers may face issues such as high latency and poor connection quality. Optimizing your network settings using tools like TCP Optimizer and TwitchTest can significantly improve your streaming quality. This guide will help you get started.
Step 1: Download TCP Optimizer
TCP Optimizer is a free, easy-to-use program that provides an intuitive interface for tuning and optimizing your Internet connection. Here’s how to download and configure it:
Download TCP Optimizer:
- Visit the official website: TCP Optimizer.
- Download the latest version of the software.
Run TCP Optimizer:
- Open TCP Optimizer as an Administrator (right-click the executable and select ‘Run as Administrator’).
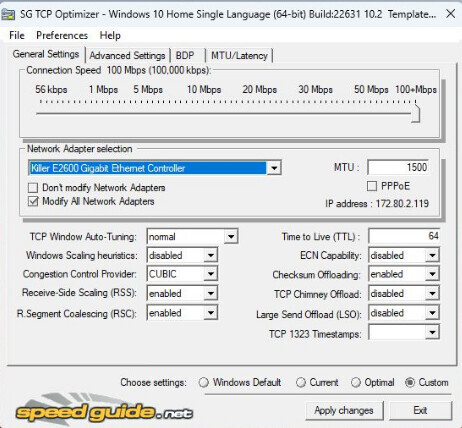
Configure TCP Optimizer:
- Set the network adapter that you use for your internet connection.
- Use the slider to set your connection speed to the maximum available for your plan.
- Select the “Optimal” settings option to automatically choose the best settings.
- Click on the “Apply changes” button.
- Reboot your system to apply the changes.
Step 2: Download and Use TwitchTest
TwitchTest is a handy tool to measure the quality of your connection to various Twitch servers. This can help you find the best server to stream from your geographical location.
Download TwitchTest:
- Visit the official GitHub repository: TwitchTest GitHub Release.
- Download the latest version suitable for your OS (Windows/Linux).
Install TwitchTest:
- For Windows, extract the ZIP file and run the ‘TwitchTest.exe’ application.
- For Linux, follow the repository instructions for building and running the application.
Run TwitchTest:
- Upon launching the tool, you’ll see an interface where you can select servers and start tests.
- Choose the Twitch servers that are closest to your geographic location (e.g., Europe or Middle East servers may offer better connectivity than North American ones).
- Run the test and evaluate the bandwidth and RTMP (Real-Time Messaging Protocol) results. Look for a server with high bandwidth and low RTT (Round-Trip Time).
Step 3: Configure Your Streaming Software
Once you have optimized your internet connection and selected the best Twitch server, configure your streaming software (OBS, Streamlabs OBS, etc.) accordingly.
Open Streaming Software:
- Launch your streaming software and go to the settings menu.
Set Up Stream Settings:
- Navigate to the ‘Stream’ settings.
- Select ‘Twitch’ as the service.
- Use the recommended server from your TwitchTest results.
- Enter your stream key (found on your Twitch dashboard under ‘Settings’ > ‘Stream’).
Adjust Output Settings:
- Set appropriate video and audio bitrates (use the Twitch streaming guidelines for recommended settings).
- Choose the encoder (software or hardware) based on your system’s capabilities.
Start Streaming:
- Double-check all settings and ensure your stream looks good in the preview.
- Click ‘Start Streaming’ and go live!
Tips for Optimal Streaming
- Use a Wired Connection: Avoid using Wi-Fi, as wired connections are more stable and offer better performance.
- Monitor System Performance: Keep an eye on your CPU and GPU usage to prevent frame drops.
- Check Bandwidth: Regularly test your internet speed to ensure you have sufficient upload bandwidth for your desired bitrate.
- Engage with Viewers: A stable, high-quality stream combined with interactive content will help you grow your audience.
By following these steps and utilizing tools like TCP Optimizer and TwitchTest, you can significantly improve your streaming quality on Twitch from your home, providing a better experience for both you and your viewers. Happy streaming!