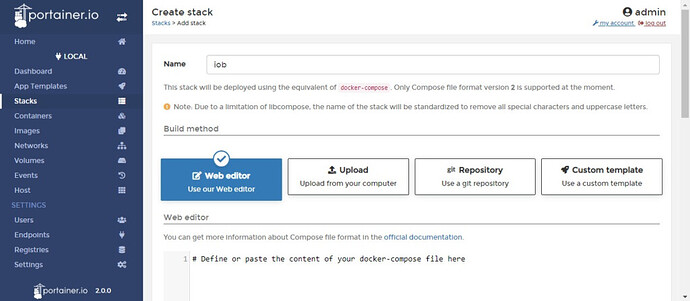
While Portainer’s graphical interface is highly intuitive, it can be cumbersome to repeatedly input the same configurations when setting up new containers. Fortunately, you can bypass this hassle with Docker Compose, which allows you to define all container options in a configuration file and deploy them automatically.
Portainer simplifies this process through a feature called “Stacks.” Essentially, this is a Docker Compose implementation under a different name.
In this tutorial, we’ll walk through the basics of using Portainer Stacks by setting up an ioBroker container as an example. We will then expand the setup by deploying both ioBroker and Redis containers together—demonstrating how to handle multiple containers in one stack.
Prerequisites
First and foremost, make sure your [Portainer] instance is up and running, and that you have the necessary administrative access to your Docker service.
In this example, we will be using a [custom bridge network]. Since the network will be created as part of the stack, no additional preparation is needed. However, ensure that the IP range for your bridge network isn’t already in use by another network.
Since the ioBroker image is relatively large, it’s a good idea to download it in advance via the “Images” section in Portainer. This will save time when deploying the stack.
Additionally, you’ll need volumes or directories on the host to store persistent data. If you’re unsure about how to set these up, refer to tutorials on deploying [ioBroker] or the [Redis container].
Creating a Stack File for the ioBroker Container
As mentioned earlier, the stack file contains all relevant details about the containers, such as networks and volumes. It is written in YAML, a markup language similar to XML. While YAML’s syntax is simple, it’s advisable to consult examples online if you’re unfamiliar with it.
Pro Tip
I recommend using the Notepad++ editor for writing stack files. It offers syntax highlighting for YAML under the “Languages” menu, which makes the code clearer and easier to read.
Now, back to Portainer. You can create your stack using the web editor, upload a Docker Compose file, or use a Git repository or custom template. For beginners, I suggest using the “Web editor” in Portainer. While it doesn’t support syntax highlighting, it does a good job of catching errors, marking them with a red X.
To begin, open the web editor by navigating to “Stacks” in the Portainer dashboard and clicking “Add stack.”
The first step is to name your stack. For simplicity, I’ll call it “iob.”
Next, we need to write the stack file. The first line should define the format version of Docker Compose that you’re using.
Important Note
Portainer Stacks currently only supports Docker Compose version 2. You can find detailed documentation on the Docker website.
Now, let’s move on to the Services section. Each service represents one container, so for ioBroker, we’ll define one service. We will continue adding the necessary configuration details until our stack file is complete. For clarity, I’ve included comments after each parameter.
Here is an example of what the final stack file for ioBroker might look like:
version: "3"
services:
  iobroker:
    container_name: iobroker  # Name of the container
    image: buanet/iobroker  # The ioBroker image
    restart: always  # Ensure the container restarts on failure
    ports:
      - "8081:8081"  # Mapping port 8081 on the host to port 8081 in the container
    volumes:
      - iobroker_data:/opt/iobroker  # Persistent storage for ioBroker data
    networks:
      - iobroker_network  # Assign to the custom bridge network

networks:
  iobroker_network:
    driver: bridge

volumes:
  iobroker_data:
This file defines a single service for ioBroker, sets up the network and volume configuration, and ensures that the container restarts automatically in case of failure. Once the stack is deployed, the container will run according to these specifications.
By using Docker Compose in Portainer Stacks, you can streamline container management and avoid the repetitive task of manually configuring each container. This approach not only saves time but also ensures consistency across deployments.
