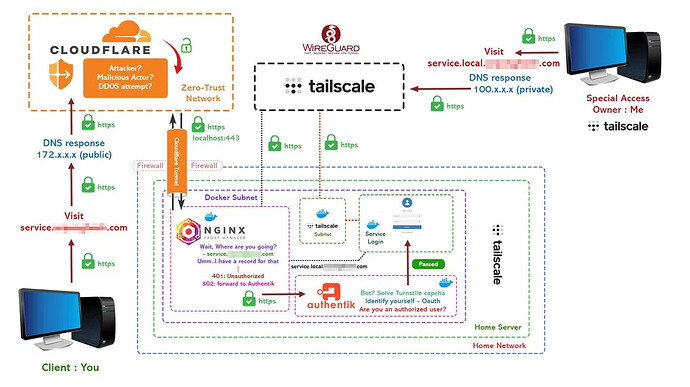
A secure setup that integrates several components, including Cloudflare, Tailscale, WireGuard, NGINX Proxy Manager, and Authentik.
Here’s a detailed step-by-step guide to achieve a similar setup:
Components Overview:
- Client Device (You): You will be accessing your home server or service from the client device.
- Cloudflare: Acts as a security layer, providing DDoS protection and Zero-Trust network for external requests.
- Tailscale: Provides private network connectivity for internal services using WireGuard VPN.
- NGINX Proxy Manager: Handles reverse proxy and forwards unauthorized users to Authentik for authentication.
- Authentik: Manages identity, provides OAuth2 authentication, and implements security checks like captcha.
- Service: The final web service or application that the client wants to access.
Detailed Setup Guide:
1. Set up Tailscale for Private Networking
- Tailscale allows you to create a private network overlay on top of your existing network using the WireGuard protocol.
- Install Tailscale on your client devices (e.g., your laptop or desktop) and your Home Server to securely route private traffic.
- Installation:
sudo apt-get update && sudo apt-get install tailscale tailscale up - You will get a private IP (in the form of
100.x.x.x) when the service starts. Use this IP to communicate with services securely within your network. - You can then access internal services via this private IP (e.g.,
100.x.x.x:443).
- Installation:
2. Cloudflare Setup for Public DNS & DDoS Protection
- Cloudflare will provide DNS resolution and DDoS protection.
- Sign up for Cloudflare and add your domain.
- Create a DNS A record pointing your public-facing domain (e.g.,
service.example.com) to your public IP. - Enable SSL/TLS encryption in Cloudflare and set it to Full (strict).
- Set up Zero-Trust network access for further protection. Cloudflare Access can enforce user authentication before allowing access to your services.
- Traffic will be routed through Cloudflare for public access requests.
3. NGINX Proxy Manager Setup
- Install NGINX Proxy Manager as a reverse proxy on your Docker network.
- NGINX Proxy Manager will serve as the gateway to your services.
- First, map the public DNS (e.g.,
service.example.com) to your NGINX Proxy Manager. - Add a new proxy host for
service.example.com:- Forward Hostname/IP: Private IP of your service (e.g.,
100.x.x.x). - Forward Port: Port number where the service is running (e.g.,
443).
- Forward Hostname/IP: Private IP of your service (e.g.,
- Enable SSL using Let’s Encrypt or Cloudflare certificates.
- First, map the public DNS (e.g.,
- NGINX will handle incoming requests and route unauthorized requests to Authentik.
4. Set up Authentik for Authentication
- Authentik will manage the authentication and authorization for your services.
- Steps to set up Authentik:
- Install Authentik using Docker.
- Set up an OAuth2 provider and create an application for your service (e.g.,
service.local). - Configure NGINX Proxy Manager to redirect unauthenticated users to Authentik:
- In your proxy settings, add the following:
- 401 error (Unauthorized) → forward to Authentik login.
- 302 redirect to Authentik if authentication is required.
- Set up CAPTCHA (Turnstile) to avoid bot access during login attempts.
- Users will be authenticated using OAuth, and only authorized users will be forwarded to the service.
5. WireGuard Setup for Remote Access
- For additional security and to access internal services securely over the internet, configure WireGuard.
- Tailscale uses WireGuard under the hood, so no additional configuration is required. However, if you want to implement a standalone WireGuard setup for non-Tailscale devices:
- Install WireGuard on your home server.
- Configure WireGuard to allow remote access to internal services.
6. Integrating Everything: Secure Access Flow
- When a user attempts to access the service (e.g.,
service.example.com), their DNS request will first be routed through Cloudflare, which will return the public IP of your service. - Cloudflare handles DDoS protection and forwards the request to NGINX Proxy Manager via secure HTTPS.
- NGINX Proxy Manager will check if the user is authorized:
- If not, the request is forwarded to Authentik for OAuth-based login.
- Once authenticated, the user is redirected back to the service through NGINX.
- Tailscale is used for private connections, allowing your personal devices (those on the private Tailscale network) to communicate with services via private IP addresses (100.x.x.x).
- You can access internal services from anywhere using Tailscale’s magic DNS or private IP without exposing them to the public.
7. Testing the Setup
- Use your Tailscale-connected device to access
service.localusing the private DNS/IP (100.x.x.x). - For external access, test the public-facing URL (
service.example.com) and confirm that unauthorized access prompts authentication through Authentik. - Ensure that Cloudflare’s DDoS protection and SSL certificates are working properly.
Tips:
- Cloudflare Rules: Configure security rules in Cloudflare to protect against malicious traffic.
- Zero-Trust Principles: Ensure that every request is authenticated, even for internal services, by using Authentik and NGINX effectively.
- Monitoring: Use tools like Prometheus and Grafana to monitor the health of your services.
This setup ensures that your services are protected both externally (with Cloudflare and NGINX) and internally (using Tailscale and WireGuard).
flowchart TD
    subgraph Public_Network[Public Internet]
        A[Client Device: Your PC] -->|Visit service.example.com| B[Cloudflare (172.x.x.x Public IP)]
        B -->|DDoS Protection & Zero-Trust Network| C[NGINX Proxy Manager (Public IP)]
    end

    subgraph Home_Network[Home Server Network]
        direction TB
        C -->|Forward Request| D[Tailscale Subnet 100.x.x.x]
        D -->|Forward to Authentik for Authentication| E[Authentik (Service.local) 192.168.1.x]

        subgraph Docker_Network[Docker Subnet 172.16.x.x]
            direction TB
            C -->|302 Redirect / 401 Unauthorized| E
            F[Tailscale Internal Service (service.local 100.x.x.x)]
        end

        E -->|Auth Passes (OAuth)| F -->|Grant Access to Service| G[Service Login (Private IP 192.168.1.x)]
    end

    %% IP Representation:
    A -->|Local Request (DNS: 100.x.x.x)| D
    C -->|Forward Unauthorized Users| E
