Proxmox VE comes with ZFS support since version 3.4 . As a copy-on-write file system, ZFS stands out with its features regarding snapshot:
- Snapshots are permanent when the system is rebooted.
- Up to 264 snapshots can be taken.
- Snapshots do not use a separate backup space. Snapshots consume disk space directly from the same storage pool as the file system or volume on which they were created.
- Recursive snapshots are created quickly, as if they were a single atomic operation. Snapshots are created together (all at the same time) or not at all. The advantage of atomic snapshot operations is that snapshot data is always taken at a consistent time, even across sub-file systems.
Snapshot capabilities of ZFS make it easier to recover from crashes or rollbacks that may occur in the VM. In this respect, if you are using ZFS in Proxmox VE , taking automatic snapshots will make your operations easier.
Remember, a snapshot is not a backup! If you have a problem outside the VM: storage, firewall, internet, hypervisor or any disaster you want to take precautions against, you can take both local and remote backups with Proxmox Backup Server .
We will set up automatic snapshot taking with the tool named cv4pve-autosnap with the following steps.
Creating a User in Proxmox VE
cv4pve-autosnap uses Proxmox VE API to connect to Proxmox VE . For this, we need to create a user and grant permissions to this user.
We add the user from the Datacenter → Permissions → Users → Add step as follows:
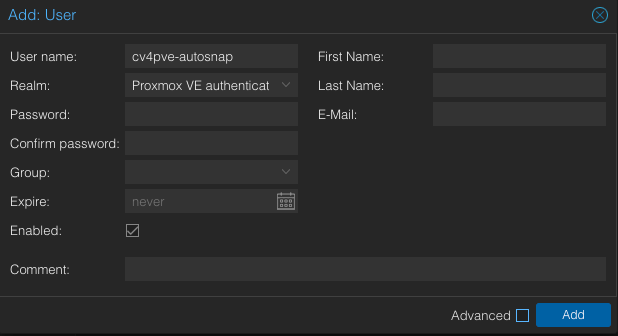
We recommend that you specify a complex password for the Password value. We oap0RLXx6qVKfrSM will use the value as the password for this document.
Creating a Role in Proxmox VE
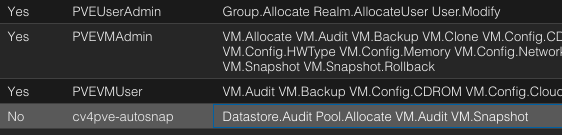
We create a role named cv4pve-autosnap with the Datacenter → Permissions → Roles → Create step and select the Datastore.Audit, Pool.Allocate, VM.Audit, VM.Snapshot permissions from the Privileges section.
Assigning Roles in Proxmox VE
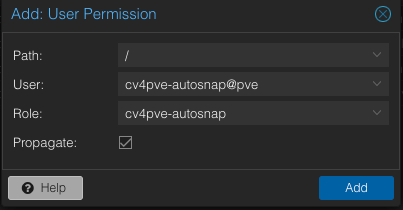
From the Datacenter → Permissions section, we assign the cv4pve -autosnap role to the cv4pve -autosnap we created :
cv4pve-autosnap Installation
We connect to any hypervisor in the Proxmox VE cluster via SSH and run the following commands in order:
# apt install -y unzip
# wget https://github.com/Corsinvest/cv4pve-autosnap/releases/download/v1.14.8/cv4pve-autosnap-linux-x64.zip
# unzip cv4pve-autosnap-linux-x64.zip
# chmod +x cv4pve-autosnap
# mv cv4pve-autosnap /usr/local/bin/
# mkdir /etc/cv4pve-autosnap
We create the following three files in the folder, respectively /etc/cv4pve-autosnap:
/etc/cv4pve-autosnap/clean.parm:
--host=localhost
--username=cv4pve-autosnap@pve
--password=oap0RLXx6qVKfrSM
--vmid=all
--timestamp-format=yyMMdd_HHmm
--max-perc-storage=80
snap
--label=hourly
--keep=16
If you want to take a snapshot for specific VMs, vmidyou can list the VMs in the parameter and give them in a comma vmid=100,101,102format :
If you want to backup all VMs and exclude certain VMs: vmid=all,-100,-101like this.
keepThe value ensures that old snapshots are automatically deleted. In the settings here, the last 16 snapshots will be stored.
/etc/cv4pve-autosnap/status.parm:
--host=localhost
--username=cv4pve-autosnap@pve
--password=oap0RLXx6qVKfrSM
--vmid=all
status
Thanks to the above files, we save the parameters for the commands:
To take a snapshot:
# cv4pve-autosnap @/etc/cv4pve-autosnap/snap.parm
ACTION Snap
PVE Version:      8.1.3
VMs:              all
Label:            hourly
Keep:             16
State:            False
Only running:     False
Timeout:          30 sec.
Timestamp format: yyMMdd_HHmm
Max % Storage :   80%
                  Storage      Type     Valid   Used %    Disk Size  Disk Usage
        pve11/local-nvme1   zfspool        Ok       4.6     1.76 TB    82.77 GB
          pve11/local-xfs       dir        Ok         6   476.71 GB     28.6 GB
          pve11/local-zfs   zfspool        Ok         0   861.02 GB       96 KB
----- VM 5001 qemu stopped -----
Skip VM is template
----- VM 7001 qemu running -----
Create snapshot: autohourly231224_1600
VM execution 00:00:03.7197946
----- VM 7002 qemu running -----
Create snapshot: autohourly231224_1600
VM execution 00:00:03.6531510
----- VM 9194 qemu running -----
VM 9194 consider enabling QEMU agent see https://pve.proxmox.com/wiki/Qemu-guest-agent
Create snapshot: autohourly231224_1601
VM execution 00:00:00.5684604
Total execution 00:00:08.2037206
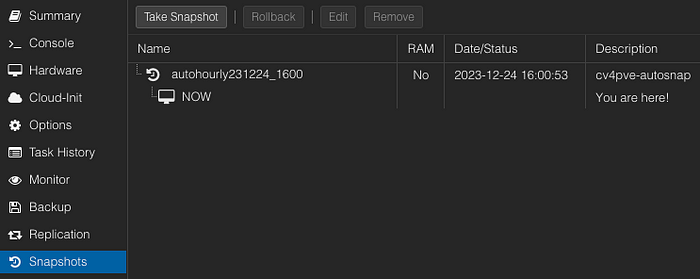
You can view the captured snapshots from the Proxmox VE interface:
To list snapshots:
# cv4pve-autosnap @/etc/cv4pve-autosnap/status.parm
+-------+------+-------------------+-----------+-----------------------+-----------------+-----------+
| NODE  | VM   | TIME              | PARENT    | NAME                  | DESCRIPTION     | VM STATUS |
+-------+------+-------------------+-----------+-----------------------+-----------------+-----------+
| pve11 | 7001 | 23/12/24 13:00:53 | no-parent | autohourly231224_1600 | cv4pve-autosnap |           |
| pve11 | 7002 | 23/12/24 13:00:57 | no-parent | autohourly231224_1600 | cv4pve-autosnap |           |
| pve11 | 9194 | 23/12/24 13:01:01 | no-parent | autohourly231224_1601 | cv4pve-autosnap |           |
+-------+------+-------------------+-----------+-----------------------+-----------------+-----------+
To clear all snapshots:
# cv4pve-autosnap @/etc/cv4pve-autosnap/clean.parm
ACTION Clean
VMs:              all
Label:            hourly
Keep:             0
Timeout:          30 sec.
Timestamp format: yyMMdd_HHmm
Skip VM is template
----- VM 7001 qemu -----
Remove snapshot: autohourly231224_1600
----- VM 7002 qemu -----
Remove snapshot: autohourly231224_1600
----- VM 9194 qemu -----
Remove snapshot: autohourly231224_1601
If we want to delete the snapshots of a specific VM, for example the VM with ID 7001, we can run the following command:
cv4pve-autosnap --host=localhost --username=cv4pve-autosnap@pve --password=oap0RLXx6qVKfrSM --vmid=7001 --timestamp-format=yyMMdd_HHmm clean --label=hourly --keep=0
If all these operations are suitable for you, you can add the following line to your crontab with the crontab -e command to take automatic snapshots every 3 hours. We added it by listing the hours, but */3it can also be used:
0 1,4,7,10,13,16,19,22 * * * /usr/local/bin/cv4pve-autosnap @/etc/cv4pve-autosnap/snap.parm
With the following command, we can also see the snapshots we took for label=hourly in the file system:
# zfs list -t all | grep hourly
local-nvme1/vm-7001-disk-0@autohourly231224_1615  3.20M      -  2.76G  -
local-nvme1/vm-7002-disk-0@autohourly231224_1615  2.95M      -  2.39G  -
local-nvme1/vm-9194-disk-0@autohourly231224_1615   880K      -  1.50G  -
We can see how much space snapshots are taking up for a particular VM disk with the following command:
# zfs get usedbysnapshots local-nvme1/vm-9194-disk-0
NAME                        PROPERTY         VALUE     SOURCE
local-nvme1/vm-9194-disk-0  usedbysnapshots  1.13M     -
The tool called proxmox-autosnap has a similar function, but it can only take automatic snapshots for VMs on the hypervisor it is installed on. For this reason, this tool needs to be installed on all hypervisors in Proxmox VE. That’s whywe preferred the tool called cv4pve-autosnap .